vue详细开发插件并且发布到npm上
本文于 393 天之前发表,文中内容可能已经过时。
这一篇开发的插件 类似elementUI中的 Message 消息提示,用this.$message()来调用 并且可以传参数
一. 前期准备
1.1、项目搭建
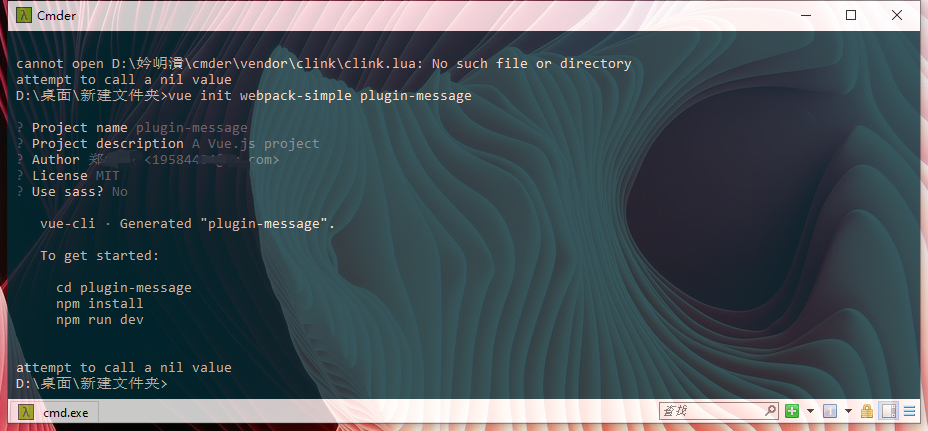
用 vue init webpack-simple myPlugin 指令去搭建项目
1
| $ vue init webpack-simple myPlugin
|
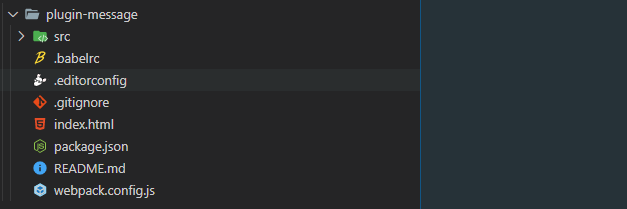
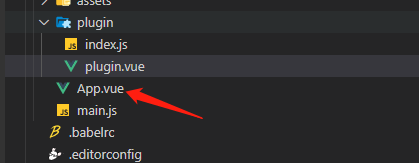
1.2、项目结构
二. 编写插件
2.1、创建插件文件

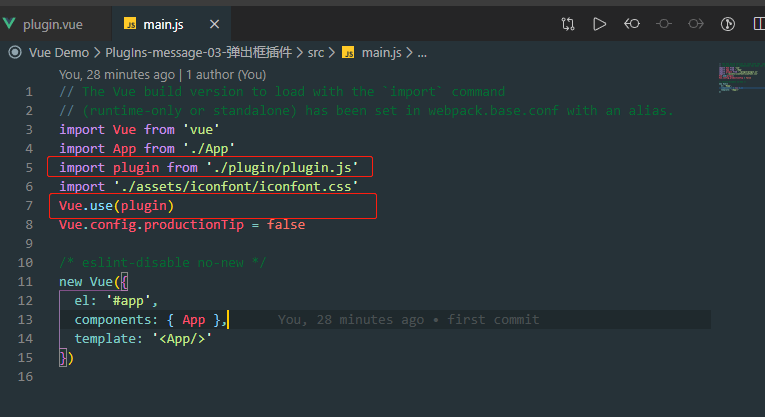
1)在src目录下新建一个plugin文件夹(这是写插件的文件),在plugin里面新建一个plugin.js和plugin.vue文件

2)调用插件(可以用先调用插件, 要不然在插件文件里面写的代码在运行项目之后看不到插件写的效果)
调用插件和elmentUI是一样的
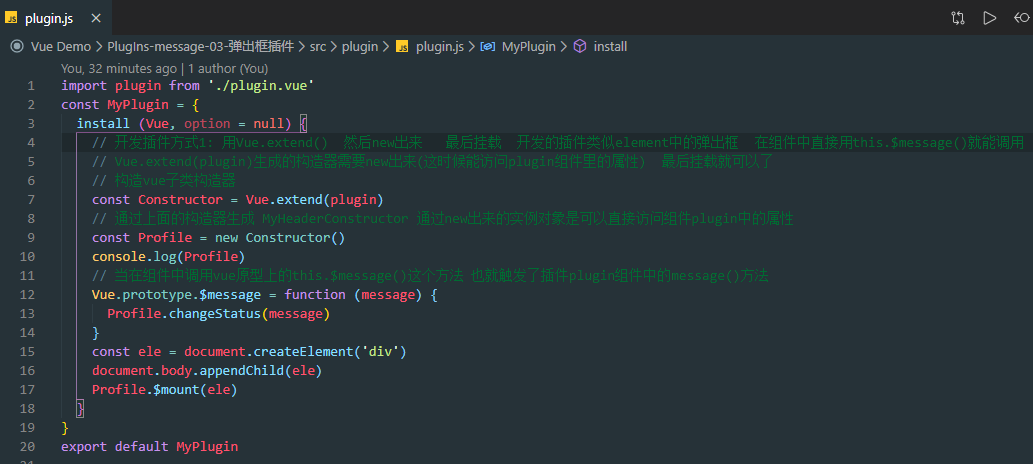
2.2、plugin.js
插件的入口文件
这里主要用到Vue.exten()构造器 (不懂自行看vue官网)
1
2
3
4
5
6
7
8
9
10
11
12
13
14
15
16
17
18
19
20
21
| import plugin from './plugin.vue'
const MyPlugin = {
install (Vue, option = null) {
const Constructor = Vue.extend(plugin)
const Profile = new Constructor()
console.log(Profile)
Vue.prototype.$message = function (message) {
Profile.changeStatus(message)
}
const ele = document.createElement('div')
document.body.appendChild(ele)
Profile.$mount(ele)
}
}
export default MyPlugin
|
2.4、plugin.vue
插件的逻辑
1
2
3
4
5
6
7
8
9
10
11
12
13
14
15
16
17
18
19
20
21
22
23
24
25
26
27
28
29
30
31
32
33
34
35
36
37
38
39
40
41
42
43
44
45
46
47
48
49
50
51
52
53
54
55
56
57
58
59
60
61
62
63
64
65
66
67
68
69
70
71
72
73
74
75
76
77
78
79
80
81
82
83
84
85
86
87
88
89
90
91
92
93
94
95
96
97
98
99
100
101
102
103
104
105
106
107
108
109
110
111
112
113
114
115
116
117
118
119
120
121
122
123
124
125
| <template>
<div class="content">
<transition name="fade">
<div class="box" v-show="isShow">
<div class="inside">
<div class="top">
<div class="circle" :class="defaulTransmit.pluginData.type === 'success' ? 'success' : 'warning'">
<i class="iconfont font" :class="defaulTransmit.pluginData.type === 'success' ? 'iconduigou' : 'icongantanhao'"></i>
</div>
</div>
<p class="botton" :class="defaulTransmit.pluginData.type === 'success' ? 'blue' : 'orange'">
{{ defaulTransmit.pluginData.message }}
</p>
</div>
</div>
</transition>
</div>
</template>
<script>
export default {
data() {
return {
defaulTransmit: {
pluginData: {}
},
isShow: false
}
},
methods: {
changeStatus(message) {
const params = {
message: message.message,
type: message.type
}
this.$set(this.defaulTransmit, 'pluginData', params)
this.isShow = true
setTimeout(() => {
this.isShow = false
}, message.time)
}
}
}
</script>
<style lang='less' scoped>
p {
margin: 0;
}
.success {
background-color: #14cab4;
}
.warning {
background-color: #ffb800;
}
// 过渡的样式
.fade-enter-active,
.fade-leave-active {
transition: all 0.3s;
// transition: opacity 0.5s;
}
// 显示时的样式
.fade-enter {
opacity: 0;
}
// 隐藏时的样式
.fade-leave-to {
opacity: 0;
}
.blue {
color: #14cab4;
}
.orange {
color: #ffb800;
}
.box {
position: absolute;
top: 50%;
left: 50%;
transform: translate(-50%, -50%);
padding: 15px 15px;
box-sizing: border-box;
width: 517px;
border: 1px solid rgb(230, 230, 230);
.top {
position: relative;
margin: 20px 0;
height: 196px;
background: url('../assets/tip.png') no-repeat center;
.circle {
position: absolute;
top: 50%;
left: 50%;
transform: translate(-50%, -40%);
width: 123px;
height: 123px;
line-height: 123px;
border-radius: 123px/2;
text-align: center;
.font {
color: #ffffff;
font-size: 75px;
}
}
}
.botton {
text-align: center;
height: 83px;
line-height: 83px;
font-family: AdobeHeitiStd-Regular;
font-size: 30px;
letter-spacing: 2px;
}
}
</style>
|
三. 使用插件
1
2
3
4
5
6
7
8
9
10
11
12
13
14
15
16
17
18
19
20
21
22
23
| // app.vue
<template>
<div id='app'>
<button @click="handle()">点击测试</button>
</div>
</template>
<script>
export default
name: 'app',
methods: {
handle () {
this.$message({
message: '警告哦,这是一条警告消息',
type: 'warning',
time: 2000
})
}
}
}
</script>
<style lang='less' scoped>
</style>
|
四. 效果

五. 发布发到npm
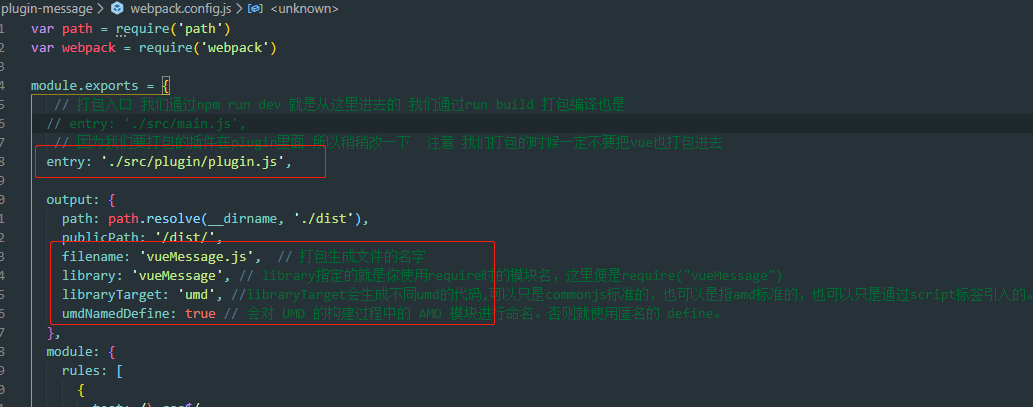
5.1、修改webpack.config.js文件
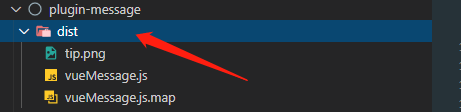
5.2、打包
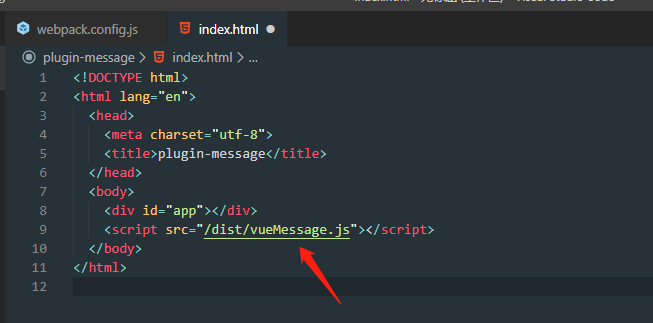
5.3.、修改引入文件
改变根目录下index.html中引入的js文件(修改成刚才打包成的dist文件夹中的js文件)
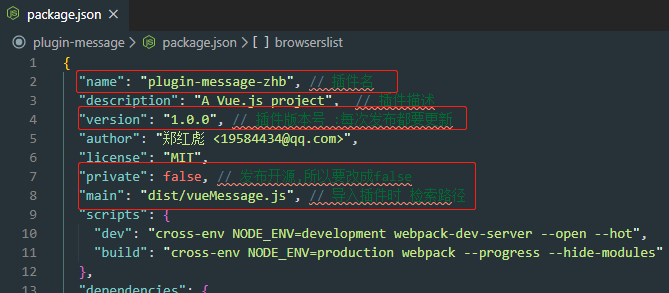
5.4、 配置package.json
版本号1.0.0默认的都需要更改
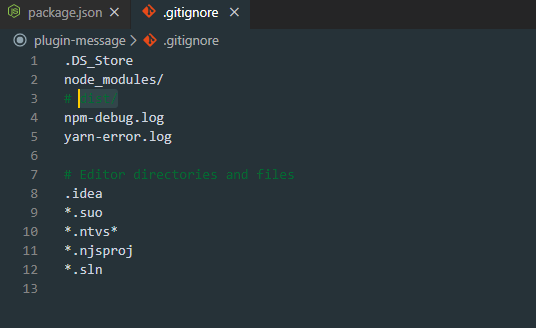
5.5、 修改gitignore 文件
在根目录下的gitignore 文件,去掉 dist/,如下:
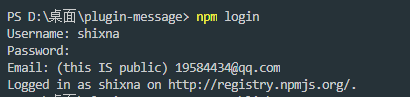
5.6、 发布到npm
1)运行命令
根据提示填写npm 账号 密码 邮箱
2)运行命令
5.7、 发布中可能遇到的问题
1)no_perms Private mode enable, only admin can publish this module
原因:因为镜像设置成淘宝镜像了,设置回来即可
方案:npm config set registry http://registry.npmjs.org
2)npm publish failed put 500 unexpected status code 401
原因:一般是没有登录
方案:重新登陆一次
3)npm ERR! you do not have permission to publish “your module name”. Are you logged in as the correct user?
原因:包名被占用
方案:修改包名即可
nrm ls 查看镜像 切换成淘宝镜像 nrm use taobao
