logo头像
Snippet 博客主题

0-1搭建vue3项目及配置

由于vite脚手架要禁止*.cjs 和 eslint版本升级废弃rc配置文件, 故重新搭建。

核心采用**antfu**大神预设配置 替代prettier和eslint设置,保留stylelint原因是暂时antfu不支持。

1、前置条件

1.1、node版本

node 最好>20 因为eslint9的需要 本次项目node为20.15.1

image-20240828103820848

1.2、包管理器

包管理器 采用pnpm

image-20241207213915592

1.3、VsCode插件

1
2
3
4
5
6
7
8
9
10
11
12
13
14
15
.vscode/extensions.json
它的作用是:当其他开发者用 VS Code 打开你的项目时,VS Code 会自动弹出提示,建议安装这些插件。
recommendations:数组,列出推荐给团队成员的 VS Code 扩展插件 ID。

{
"recommendations": [
"Vue.volar",
"dbaeumer.vscode-eslint",
"esbenp.prettier-vscode",
"csstools.postcss",
"stylelint.vscode-stylelint",
"antfu.unocss",
"simonhe.to-unocss"
]
}

image-20240828103527225

image-20240828103542672

image-20240828103556492

image-20240828103620621

image-20240828103706879

image-20240828140147090


2、创建项目

1
2
3
4
5
6
7
8
9
10
11
12
13
14
15
16
17
18
19
20
21
22
23
24
25
26
27
28
29
30
31
32
33
34
35
36
37
38
39
40
41
42
43
44
45
46
47
48
49
50
51
# 创建(二选一)
pnpm create vite (vite官方)
pnpm create vue@latest (vue官方)

# 命名
? Project name: » vite-project

# 选择框架
Vanilla
> Vue
React
Preact
Lit
Svelte
Solid
Qwik
Others

# 选择自己需要的语言
? Select a variant: »
TypeScript
JavaScript
> Customize with create-vue (现成的模板——推荐)
Nuxt

# 选配
√ 是否使用 TypeScript 语法? » 是
√ 是否启用 JSX 支持? » 是
√ 是否引入 Vue Router 进行单页面应用开发? » 是
√ 是否引入 Pinia 用于状态管理? » 是
√ 是否引入 Vitest 用于单元测试? » 是
√ 是否要引入一款端到端(End to End)测试工具? » 不需要
√ 是否引入 ESLint 用于代码质量检测? » 否

# 初始化依赖
dependencies:
+ pinia 2.3.1
+ vue 3.5.13
+ vue-router 4.5.0

devDependencies:
+ @tsconfig/node22 22.0.0
+ @types/node 22.10.10
+ @vitejs/plugin-vue 5.2.1
+ @vitejs/plugin-vue-jsx 4.1.1
+ @vue/tsconfig 0.7.0
+ npm-run-all2 7.0.2
+ typescript 5.7.3
+ vite 6.0.11
+ vite-plugin-vue-devtools 7.7.1
+ vue-tsc 2.2.0

image-20250402001720296

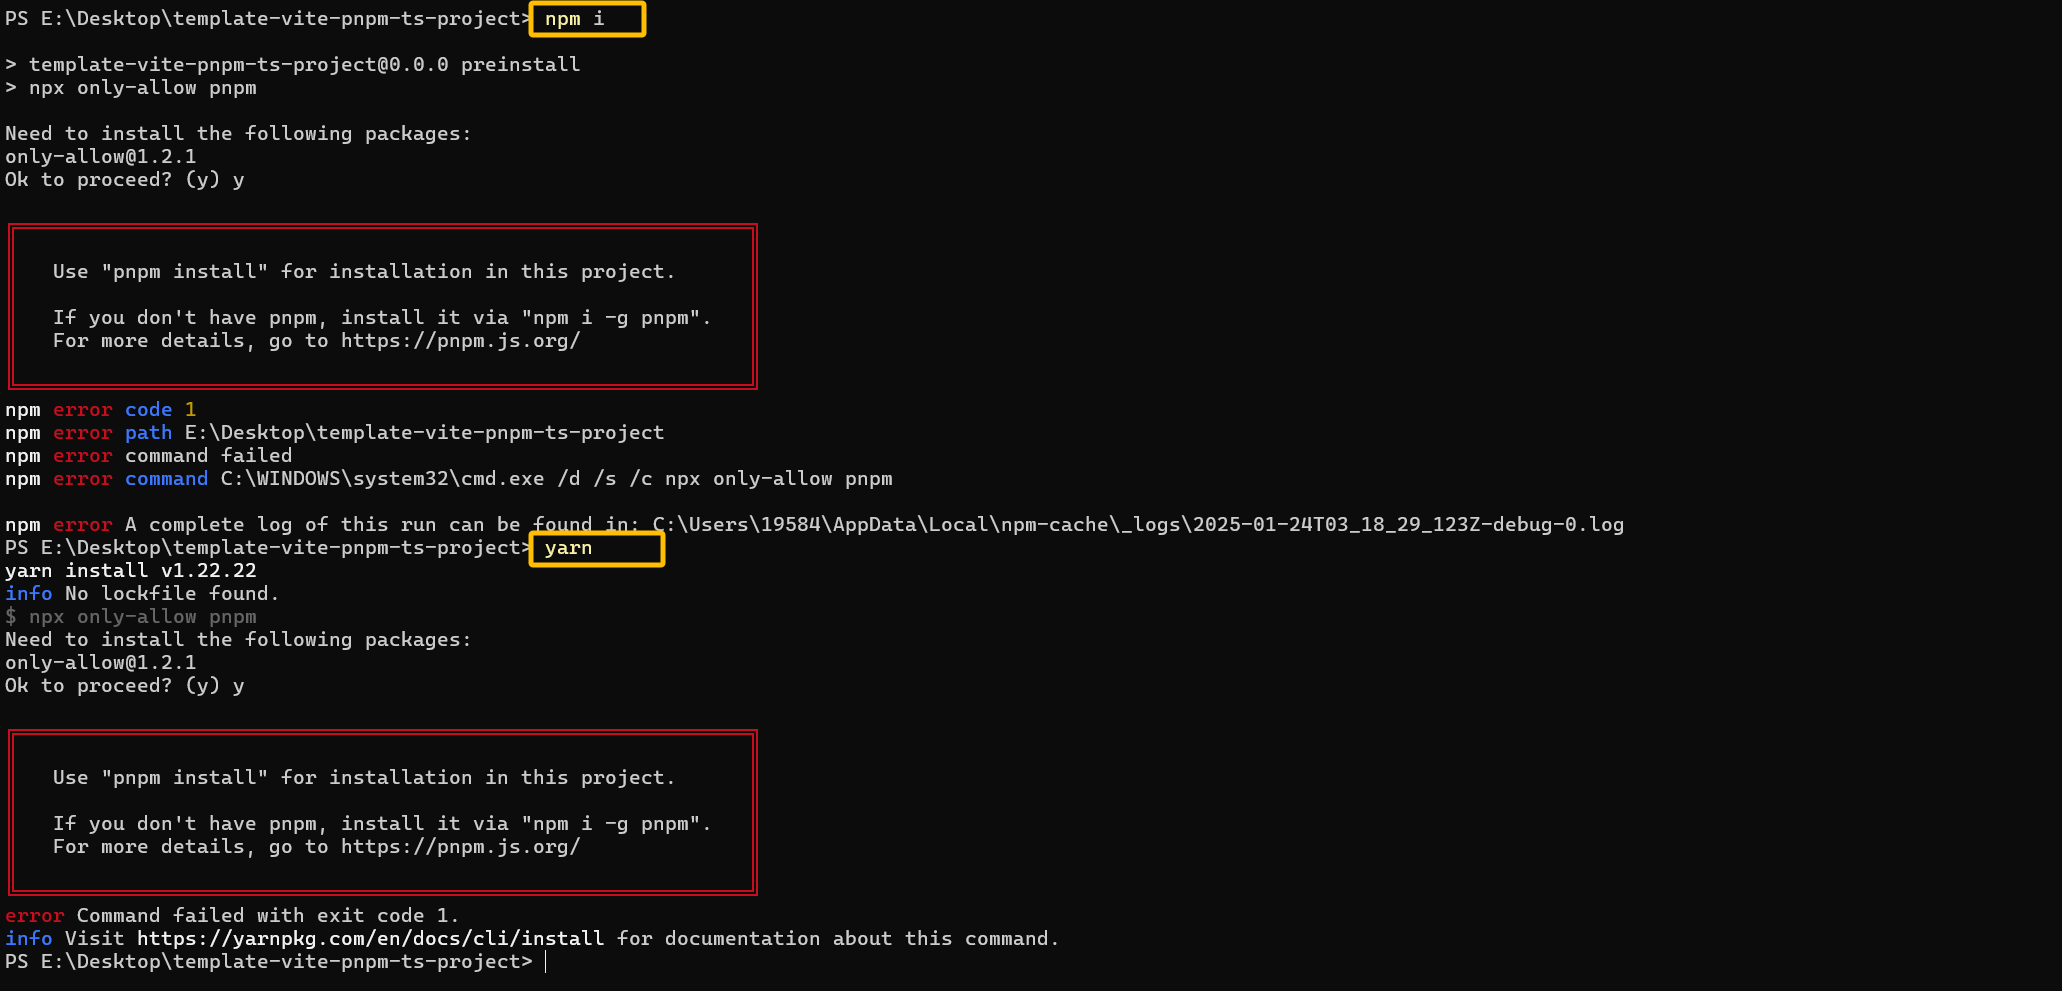
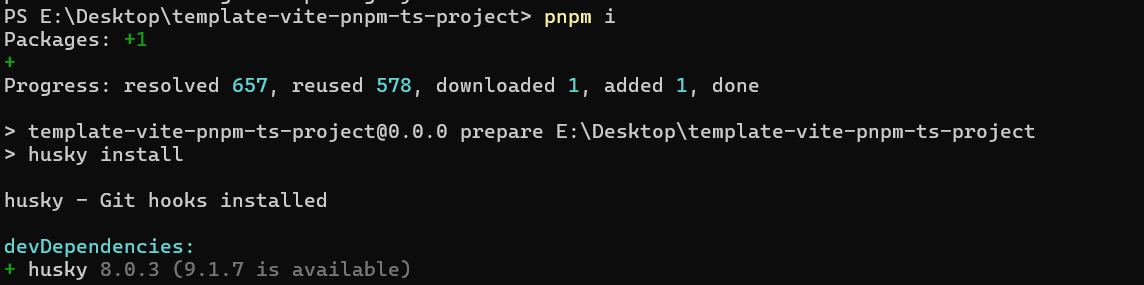
如果pnpm版本是 v10.1.0 及以上,安装依赖包的时候pnpm i会有这个警告提示。因为pnpm 从 v10.1.0 开始引入安全机制,默认禁止依赖包运行构建脚本(如 postinstall),需要手动批准。若未明确允许 esbuild 的脚本执行,则会出现此警告。

解决:修改配置文件(适合长期配置)

1
2
3
4
5
{
"pnpm": {
"onlyBuiltDependencies": ["esbuild"]
}
}

3、强制使用pnpm

engines 字段用于指定支持的 Node.js 版本以及其他依赖包的版本范围。它既不具有提示作用也不具有限制作用,它仅仅是一个标准,告诉使用者该软件包支持哪些版本的环境。

"preinstall": "npx only-allow pnpm"则具有强制作用,必须使用pnpm。

1
2
3
4
5
6
7
8
/ package.json
"engines": {
"node": ">=20.15.1",
"pnpm": ">=9.0.6"
},
"scripts": {
"preinstall": "npx only-allow pnpm"
},

image-20250124112043588


4、.vscode 配置文件

用于保存带代码格式化功能

.vscode/setting.json

1
2
3
4
5
6
7
8
9
10
11
12
13
14
15
16
17
18
19
20
21
22
23
24
25
26
27
28
29
30
31
32
33
34
35
36
37
38
39
40
41
42
43
44
45
46
47
48
49
50
51
52
53
54
55
56
57
58
59
60
61
62
63
64
65
66
67
68
69
70
71
72
73
74
75
76
77
78
79
80
81
82
83
84
85
86
87
88
89
90
91
92
93
94
95
96
97
98
99
100
101
102
103
104
105
106
107
108
109
110
111
112
113
114
115
116
117
118
119
120
121
122
123
124
125
126
127
128
129
130
131
132
133
134
135
136
137
138
139
140
141
142
143
144
145
146
147
148
149
150
{
// 这行配置开启了文件嵌套功能,使其在文件资源管理器中生效。
"explorer.fileNesting.enabled": true,
// 这是一个对象,其中定义了多个文件嵌套的模式。每个键值对定义了一个主文件和与之相关联的文件模式
"explorer.fileNesting.patterns": {
"tsconfig.json": "tsconfig.*.json, env.d.ts",
"vite.config.*": "jsconfig*, vitest.config.*, cypress.config.*, playwright.config.*",
"package.json": "package-lock.json, pnpm*, .yarnrc*, yarn*, .eslint*, eslint*, .prettier*, prettier*, .editorconfig, commitlint.config.*, lint-staged.config.*, stylelint.config.*, uno.config.*,.gitignore,.stylelintignore"
},
"typescript.tsdk": "./node_modules/typescript/lib", // 配置 TypeScript 语言服务的 SDK 路径,指向本地的 TypeScript 库。
"npm.packageManager": "pnpm", // 配置使用的包管理器为 pnpm。 设置主要影响 VS Code 内置的一些自动化任务和脚本运行,但并不会影响你在终端中手动输入的命令。
"editor.tabSize": 4, // 设置编辑器中的制表符宽度为 4 个空格。
"editor.defaultFormatter": "esbenp.prettier-vscode", // 指定默认的代码格式化工具为 esbenp.prettier-vscode
// 保存文件缓慢时,可以考虑开启以下 3 行配置。
"vue.server.maxOldSpaceSize": 4096, // 设置 Vue 服务器端渲染的最大内存限制为 4GB。
"vue.server.hybridMode": true, // 启用 Vue 服务器端渲染的混合模式。
"typescript.tsserver.maxTsServerMemory": 4096, // 设置 TypeScript 语言服务的最大内存限制为 4GB。
"files.eol": "\n", // 设置文件的行结束符为换行符(\n)。
"editor.guides.bracketPairs": true, // 启用括号对高亮显示功能。
"editor.bracketPairColorization.enabled": true, // 启用括号对颜色突出显示功能。
"vue.inlayHints.missingProps": true, // 启用 Vue 组件的属性提示功能。
"vue.autoInsert.dotValue": true, // 自动插入缺失的属性值。
"explorer.copyRelativePathSeparator": "/", // 设置复制相对路径时使用的分隔符为正斜杠。
"search.exclude": { // 配置要排除的文件和目录,以减少不必要的搜索。
"**/node_modules": true,
"**/*.log": true,
"**/*.log*": true,
"**/bower_components": true,
"**/dist": true,
"**/elehukouben": true,
"**/.git": true,
"**/.gitignore": true,
"**/.svn": true,
"**/.DS_Store": true,
"**/.idea": true,
"**/.vscode": false,
"**/pnpm i.lock": true,
"**/tmp": true,
"out": true,
"dist": true,
"node_modules": true,
"CHANGELOG.md": true,
"examples": true,
"res": true,
"screenshots": true,
"pnpm i-error.log": true,
"**/.pnpm i": true
},
"files.exclude": { // 配置要排除的文件和目录,以减少不必要的文件搜索和处理。
"**/.cache": true,
"**/.editorconfig": true,
"**/.eslintcache": true,
"**/bower_components": true,
"**/.idea": true,
"**/tmp": true,
"**/.git": true,
"**/.svn": true,
"**/.hg": true,
"**/CVS": true,
"**/.DS_Store": true
},
"files.watcherExclude": { // 配置文件监视器中要排除的文件和目录,以减少不必要的文件监视。
"**/.git/objects/**": true,
"**/.git/subtree-cache/**": true,
"**/.vscode/**": true,
"**/node_modules/**": true,
"**/tmp/**": true,
"**/bower_components/**": true,
"**/dist/**": true,
"**/pnpm i.lock": true
},
"eslint.useFlatConfig": true, // 启用 ESLint 的扁平化配置。
"stylelint.enable": true, // 启用 stylelint 验证。
"stylelint.validate": [ // 配置要验证的文件类型,包括 CSS、LESS、SCSS、Vue、Sass。
"css",
"less",
"postcss",
"scss",
"vue",
"sass"
],
"path-intellisense.mappings": { // 配置路径别名,用于提高代码可读性和开发效率。
"@/": "${workspaceRoot}/src"
},

// "i18n-ally.localesPaths": ["src/locales/lang"], // 配置 i18n-ally 插件的语言文件路径。
// "i18n-ally.keystyle": "nested", // 配置 i18n-ally 插件的键风格为嵌套。
// "i18n-ally.sortKeys": true, // 配置 i18n-ally 插件的键排序。
// "i18n-ally.namespace": true, // 配置 i18n-ally 插件的命名空间。
// "i18n-ally.pathMatcher": "{locale}/{namespaces}.{ext}", // 配置 i18n-ally 插件的路径匹配器。
// "i18n-ally.enabledParsers": ["json"], // 配置 i18n-ally 插件的启用解析器。
// "i18n-ally.sourceLanguage": "en", // 配置 i18n-ally 插件的源语言。
// "i18n-ally.displayLanguage": "zh-CN", // 配置 i18n-ally 插件的显示语言。
// "i18n-ally.enabledFrameworks": ["vue", "react"], // 配置 i18n-ally 插件的启用框架。

// 禁用默认格式化程序,改用eslint
"prettier.enable": false,
"editor.formatOnSave": false,
// 自动修复
"editor.codeActionsOnSave": { // 保存时格式化
// 保存时启用eslint格式化
"source.fixAll.eslint": "explicit",
// "never"表示在保存文件时,不会自动整理或排序import语句。性能消耗大,因此关闭。
"source.organizeImports": "never",
// 保存时启用stylelint格式化less或是sass
"source.fixAll.stylelint": "explicit"
},

// 自定义 ESLint 规则的行为,关闭某些风格规则的警告,但仍然允许自动修复。
"eslint.rules.customizations": [
{ "rule": "style/*", "severity": "off", "fixable": true },
{ "rule": "format/*", "severity": "off", "fixable": true },
{ "rule": "*-indent", "severity": "off", "fixable": true },
{ "rule": "*-spacing", "severity": "off", "fixable": true },
{ "rule": "*-spaces", "severity": "off", "fixable": true },
{ "rule": "*-order", "severity": "off", "fixable": true },
{ "rule": "*-dangle", "severity": "off", "fixable": true },
{ "rule": "*-newline", "severity": "off", "fixable": true },
{ "rule": "*quotes", "severity": "off", "fixable": true },
{ "rule": "*semi", "severity": "off", "fixable": true }
],

// 禁用 CSS、LESS 和 SCSS 的内置验证。
"css.validate": false,
"less.validate": false,
"scss.validate": false,
// 启用 ESLint 支持的所有语言类型
"eslint.validate": [
"javascript",
"javascriptreact",
"typescript",
"typescriptreact",
"vue",
"html",
"markdown",
"json",
"jsonc",
"yaml",
"toml",
"xml",
"gql",
"graphql",
"astro",
"css",
"less",
"scss",
"pcss",
"postcss"
]
}

这两行的作用就是文件嵌套作用

1
2
3
4
5
6
"explorer.fileNesting.enabled": true,
"explorer.fileNesting.patterns": {
"tsconfig.json": "tsconfig.*.json, env.d.ts",
"vite.config.*": "jsconfig*, vitest.config.*, cypress.config.*, playwright.config.*",
"package.json": "package-lock.json, pnpm*, .yarnrc*, yarn*, .eslint*, eslint*, .prettier*, prettier*, .editorconfig"
}

image-20250124144015367


5、styleLint 【采用】

less和sass 推荐只选一个

5.1、依赖包

1
2
3
4
5
6
7
8
9
10
devDependencies:
+ less 4.2.2
+ postcss-less 6.0.0
+ sass 1.83.4
+ postcss-scss 4.0.9
+ postcss 8.5.1
+ postcss-html 1.8.0
+ stylelint 16.13.2
+ stylelint-config-recess-order 6.0.0
+ stylelint-config-standard 37.0.0

5.2、安装

1
2
3
4
5
# 选择sass
pnpm i sass postcss postcss-scss postcss-html stylelint stylelint-config-standard-scss stylelint-config-recess-order -D

# 选择lees
pnpm i less postcss postcss-less postcss-html stylelint stylelint-config-standard-less stylelint-config-recess-order -D
依赖说明备注
stylelintstylelint核心库stylelint
stylelint-config-standardStylelint 的标准配置,适用于普通的 CSS 文件帮助开发者编写一致、规范的 CSS 代码。
stylelint-config-standard-scss专门为 SCSS(Sass)文件设计的标准配置在此stylelint-config-standard基础上扩展了对 SCSS 语法的支持
stylelint-config-standard-less专门为 less文件设计的标准配置在此stylelint-config-standard基础上扩展了对 less语法的支持
stylelint-config-recess-order提供优化样式顺序配置css样式书写顺序规范
postcss处理 CSS 的工具自动添加浏览器前缀、CSS 进行压缩、去除未使用的 CSS、合并相同的选择器等优化操作等等
postcss-scsspostcss的scss解析器postcss-scss文档,支持css行类注释
postcss-html解析html(类似html)的postcss语法postcss-html文档

如果项目使用的是scss就使用stylelint-config-standard-scss,如果scss和less都没使用则安装stylelint-config-standard

5.3、配置文件

stylelint.config.mjs

1
2
3
4
5
6
7
8
9
10
11
12
13
14
15
16
17
18
19
20
21
22
23
24
25
26
27
28
29
30
31
32
33
34
35
36
37
38
39
40
41
42
43
44
45
46
47
48
49
50
51
52
53
54
55
56
57
58
59
60
61
62
63
64
65
66
67
68
69
70
71
72
73
74
75
76
77
78
79
80
81
82
83
84
85
86
87
88
89
90
91
92
93
94
95
96
97
98
/** @type {import('stylelint').Config} */
export default {
// stylelint-config-standard 基础配置
// stylelint-config-recess-order 样式顺序
extends: ['stylelint-config-standard-scss', 'stylelint-config-recess-order'],
// 不同文件类型用不同解析器
overrides: [
{
files: ['**/*.(css|html|vue)'],
customSyntax: 'postcss-html',
},
// 选less可以注释scss
// {
// files: ['*.less', '**/*.less'],
// customSyntax: 'postcss-less',
// },
// 选sass可以注释上面的less
{
files: ['*.scss', '**/*.scss'],
customSyntax: 'postcss-scss',
rules: {
'scss/percent-placeholder-pattern': null,
'scss/at-mixin-pattern': null,
},
},
],
rules: {
// 'prettier/prettier': true,
'media-feature-range-notation': null,
'scss/at-mixin-pattern': null,
'selector-not-notation': null,
'import-notation': null,
'function-no-unknown': null,
'selector-class-pattern': null,
'selector-pseudo-class-no-unknown': [
true,
{
ignorePseudoClasses: ['global', 'deep'],
},
],
'selector-pseudo-element-no-unknown': [
true,
{
ignorePseudoElements: ['v-deep', ':deep'],
},
],
'at-rule-no-unknown': [
true,
{
ignoreAtRules: [
'tailwind',
'apply',
'variants',
'responsive',
'screen',
'function',
'if',
'each',
'include',
'mixin',
'extend',
'use',
],
},
],
'no-empty-source': null,
'named-grid-areas-no-invalid': null,
'no-descending-specificity': null,
'font-family-no-missing-generic-family-keyword': null,
'rule-empty-line-before': [
'always',
{
ignore: ['after-comment', 'first-nested'],
},
],
'unit-no-unknown': [true, { ignoreUnits: ['rpx'] }],
'order/order': [
[
'dollar-variables',
'custom-properties',
'at-rules',
'declarations',
{
type: 'at-rule',
name: 'supports',
},
{
type: 'at-rule',
name: 'media',
},
'rules',
],
{ severity: 'error' },
],
},
ignoreFiles: ['**/*.js', '**/*.jsx', '**/*.tsx', '**/*.ts'],
}

5.4、新增脚本

package.json

1
2
3
4
5
6
{
"scripts": {
// 修复报错
"lint:stylelint": "stylelint \"**/*.{css,scss,less,vue,html}\" --fix"
}
}

5.4、添加忽略文件

.stylelintignore

1
2
/dist/*
/public/*

6、antfu 组合prettier&eslint 【采用】

配置网站 https://github.com/antfu/eslint-config/tree/feat/support-eslint-9?tab=readme-ov-file

先选一个unocss 免得后续再去安装unocss的@unocss/eslint-plugin

6.1、命令行界面 (CLI) 安装

1
2
/ 空格选择 回车下一步
npx @antfu/eslint-config@latest

image-20250124161525291

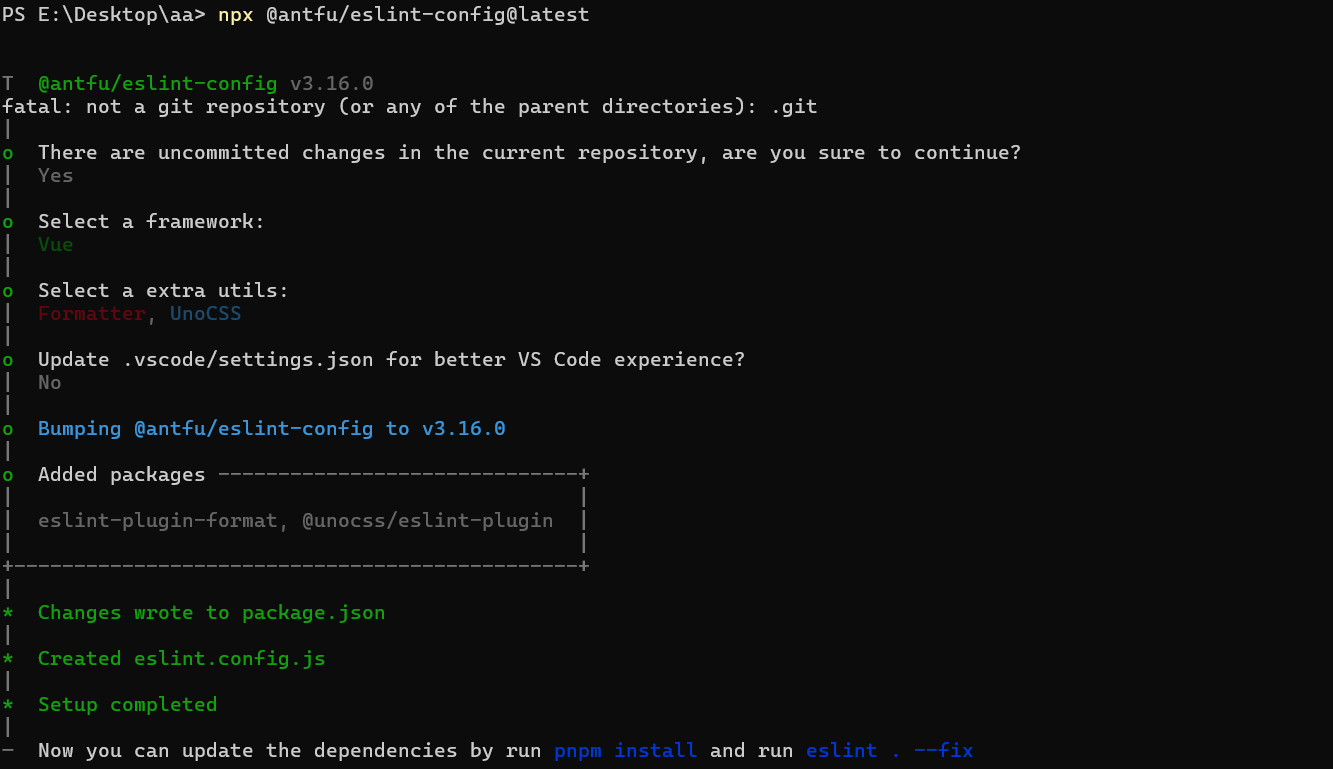
最后一步选NO,配置setting.json中的内容,因为之前一次性配置了,因为这里选no。

1
2
3
4
5
devDependencies:
+ @antfu/eslint-config 3.16.0
+ @unocss/eslint-plugin 65.4.3
+ eslint 9.18.0
+ eslint-plugin-format 1.0.1

默认会添加这些依赖到包管理文件package.json(未安装),因此需要重新安装下依赖

1
pnpm i

6.2、配置文件

修改生成配置文件eslint.config.jseslint.config.mjs 用于eslint规则校验

1
2
3
4
5
6
7
8
9
10
11
12
13
14
15
16
17
18
19
20
21
22
23
24
25
26
27
28
29
30
31
32
33
34
35
36
37
38
39
40
41
42
43
44
45
46
47
48
49
50
51
import antfu from '@antfu/eslint-config'

export default antfu(
{
stylistic: {
indent: 4, // 缩进
quotes: 'single', // 单引号
},
formatters: true, //
typescript: true, // 支持ts
unocss: true, // 支持unocss
isInEditor: false, // 保存删除未引入的代码
vue: {
overrides: {
// vue文件顺序
'vue/block-order': ['error', { order: [['template', 'script'], 'style'] }],
'vue/singleline-html-element-content-newline': 'off', // 关闭单行元素内容换行
},
},
},
{
rules: {
'no-console': 'off', // 关闭console检查
'no-debugger': 'off', // 关闭debugger检查
'antfu/top-level-function': 'off', // 顶级函数检测(开启时会将箭头函数转换为普通函数)
'antfu/if-newline': 'off', // 禁止换行 例如 if (a) return a使这种return a不会换行
'style/brace-style': 'off', // 关闭大括号风格检查(只要有大括号就会换行的情况)
'no-alert': 'off', // 关闭alert检查
},
},
{
// 9x版本 忽略文件这种配置方式 废弃掉eslintignore
ignores: [
'*.md',
'**/*.md',
'*.sh',
'.husky',
'.local',
'node_modules',
'*.md',
'*.woff',
'*.ttf',
'.idea',
'docs/**',
'public/**',
'/bin/**',
'Dockerfile',
],
},
)


6.3、新增脚本

1
2
3
4
5
6
7
{
"scripts": {
// ...
"lint": "eslint .", // 检测
"lint:fix": "eslint . --fix" // 修复
}
}

7、.gitignore文件

1
2
3
4
5
6
7
8
9
10
11
12
13
14
15
16
17
18
19
20
21
22
23
24
25
26
27
28
29
30
31
32
33
34
35
36
37
38
39
40
41
42
43
44
45
46
47
48
49
50
51
52
53
54
55
56
57
58
59
60
61
62
63
64
65
66
67
68
69
70
71
72
73
74
75
76
77
78
79
80
81
82
83
84
85
86
87
88
89
90
91
92
93
94
95
96
97
98
99
100
101
102
103
104
105
106
107
108
109
110
111
112
113
114
115
116
117
# Logs
logs
*.log
npm-debug.log*
yarn-debug.log*
yarn-error.log*
lerna-debug.log*

# Diagnostic reports (https://nodejs.org/api/report.html)
report.[0-9]*.[0-9]*.[0-9]*.[0-9]*.json

# Runtime data
pids
*.pid
*.seed
*.pid.lock

# Directory for instrumented libs generated by jscoverage/JSCover
lib-cov

# Coverage directory used by tools like istanbul
coverage
*.lcov

# nyc test coverage
.nyc_output

# Grunt intermediate storage (https://gruntjs.com/creating-plugins#storing-task-files)
.grunt

# Bower dependency directory (https://bower.io/)
bower_components

# node-waf configuration
.lock-wscript

# Compiled binary addons (https://nodejs.org/api/addons.html)
build/Release

# Dependency directories
node_modules/
jspm_packages/

# Snowpack dependency directory (https://snowpack.dev/)
web_modules/

# TypeScript cache
*.tsbuildinfo

# Optional npm cache directory
.npm

# Optional eslint cache
.eslintcache

# Microbundle cache
.rpt2_cache/
.rts2_cache_cjs/
.rts2_cache_es/
.rts2_cache_umd/

# Optional REPL history
.node_repl_history

# Output of 'npm pack'
*.tgz

# Yarn Integrity file
.yarn-integrity


# parcel-bundler cache (https://parceljs.org/)
.cache
.parcel-cache

# Next.js build output
.next
out

# Nuxt.js build / generate output
.nuxt
dist

# Gatsby files
.cache/
# Comment in the public line in if your project uses Gatsby and not Next.js
# https://nextjs.org/blog/next-9-1#public-directory-support
# public

# vuepress build output
.vuepress/dist

# Serverless directories
.serverless/

# FuseBox cache
.fusebox/

# DynamoDB Local files
.dynamodb/

# TernJS port file
.tern-port

# Stores VSCode versions used for testing VSCode extensions
.vscode-test

# yarn v2
.yarn/cache
.yarn/unplugged
.yarn/build-state.yml
.yarn/install-state.gz
.pnp.*

stats.html

.stylelintcache

8、代码提交检查

Husky + Lint-staged + Commitlint 来配置 Git 提交代码规范。

核心内容是配置 Huskypre-commitcommit-msg 两个钩子:

**pre-commit:**Husky + Lint-staged 整合实现 Git 提交前代码规范检测/格式化 (前提:ESlint + Prettier + Stylelint 代码统一规范);

commit-msg Husky + Commitlint 整合实现生成规范化且高度自定义的 Git commit message。

8.1、husky Git 钩子工具

Husky 是 Git 钩子工具,可以设置在 git 各个阶段(pre-commitcommit-msg 等)触发。

官网https://typicode.github.io/husky 推荐安装指令


命令行界面 (CLI) 安装

1
npx husky-init

image-20250124173230055

image-20240207141214268

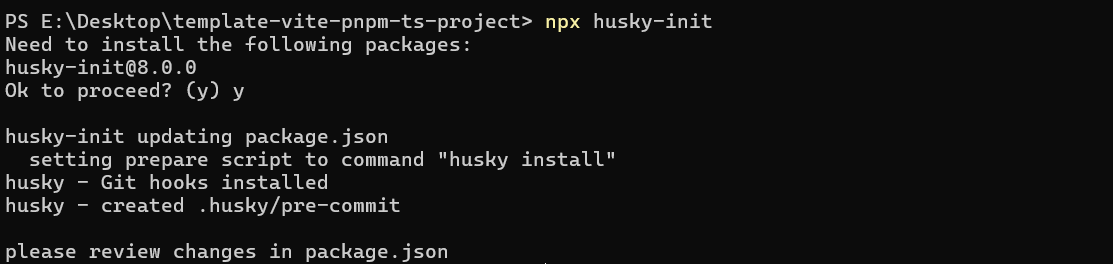
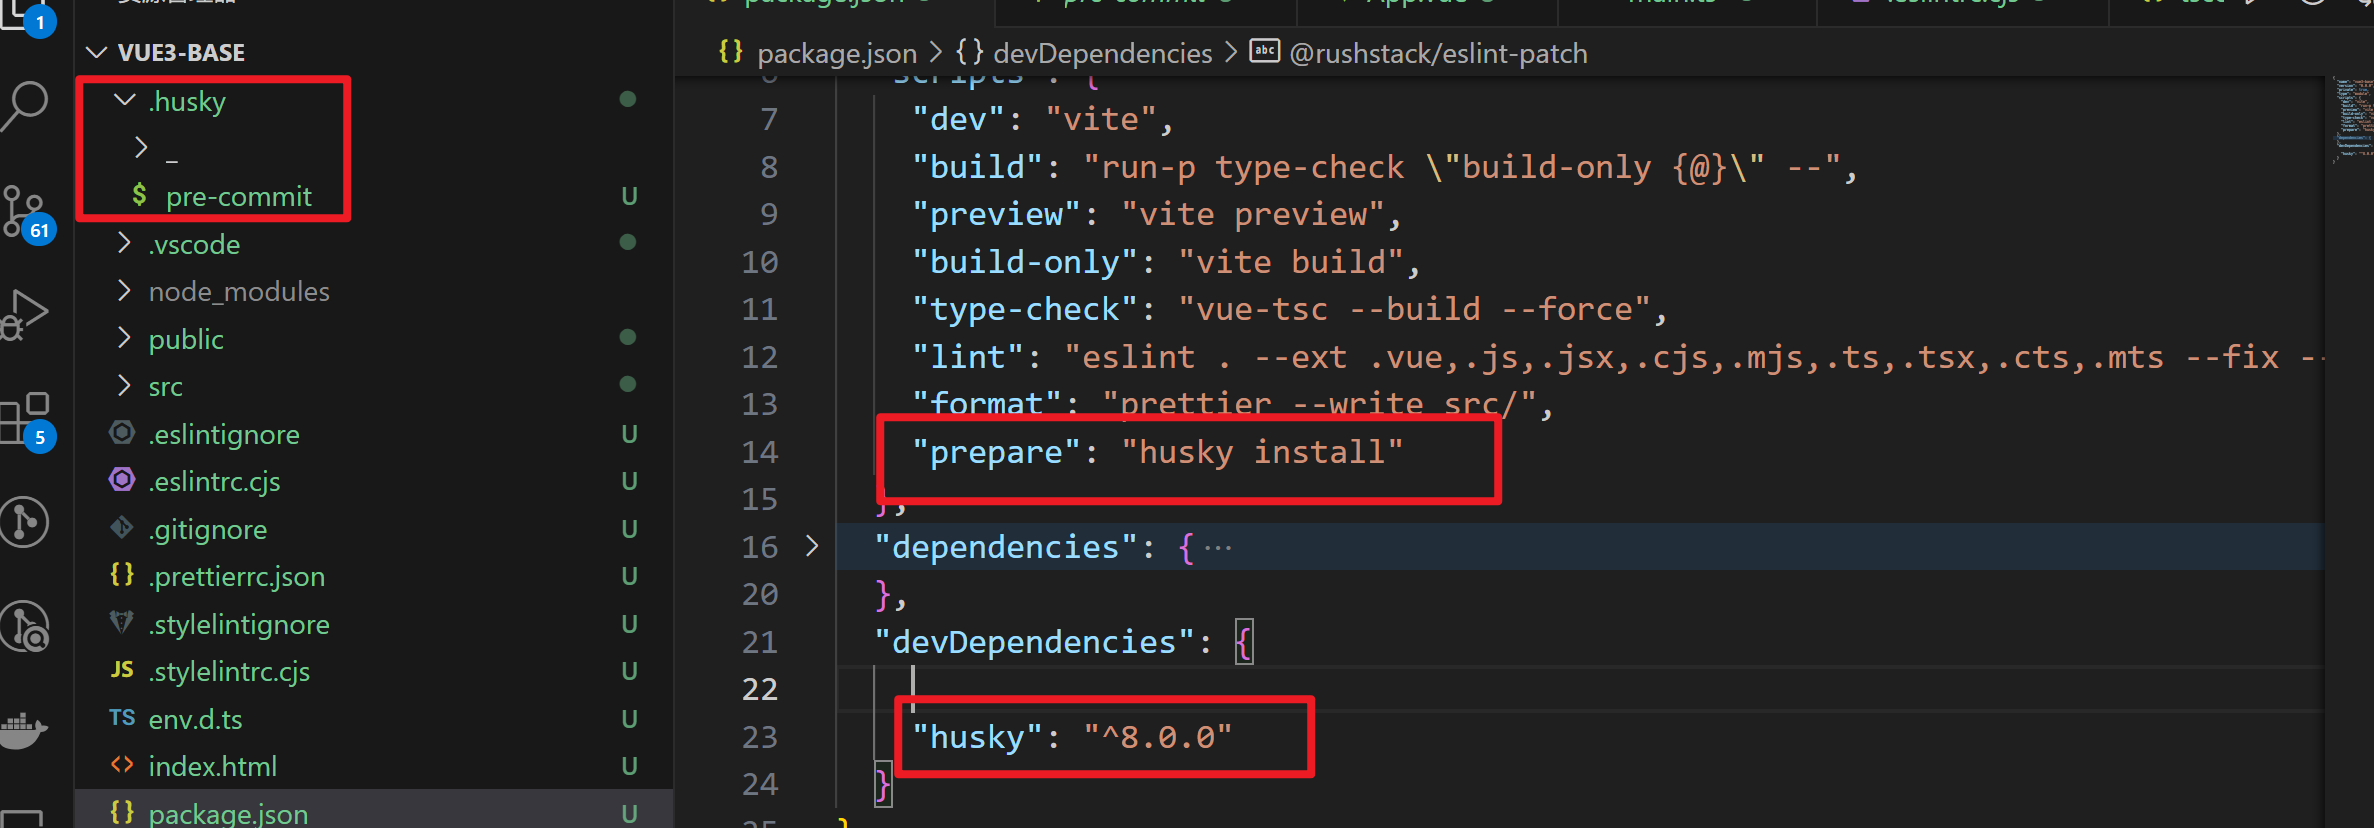
默认会添加这个依赖到包管理文件package.json(未安装),因此需要重新安装下依赖

1
/ pnpm i

image-20250124173359482


8.2、Lint-staged 检测提交代码

lint-staged 是一个在 git add 到暂存区的文件运行 linters (ESLint/Prettier/StyleLint) 的工具进行检测,避免在 git commit 提交时在整个项目执行。

1)安装
1
pnpm i lint-staged -D
2)配置文件 

a、新建 lint-staged.config.mjs 配置文件

cache缓存能使钩子检测速度更快

1
2
3
4
5
6
7
8
9
10
11
/**  @type {import('lint-staged').Config} */
export default {
'*.{js,ts,tsx,vue}': [
'eslint --fix --cache --cache-location .eslintcache',
],
'*.{scss,html}': [
'stylelint --fix --cache --cache-location .stylelintcache --allow-empty-input',
],
'*.css': ['prettier --write'],
}

b、package.json 中添加指令

1
2
3
4
"scripts": {
// ...
"lint:lint-staged": "lint-staged"
},

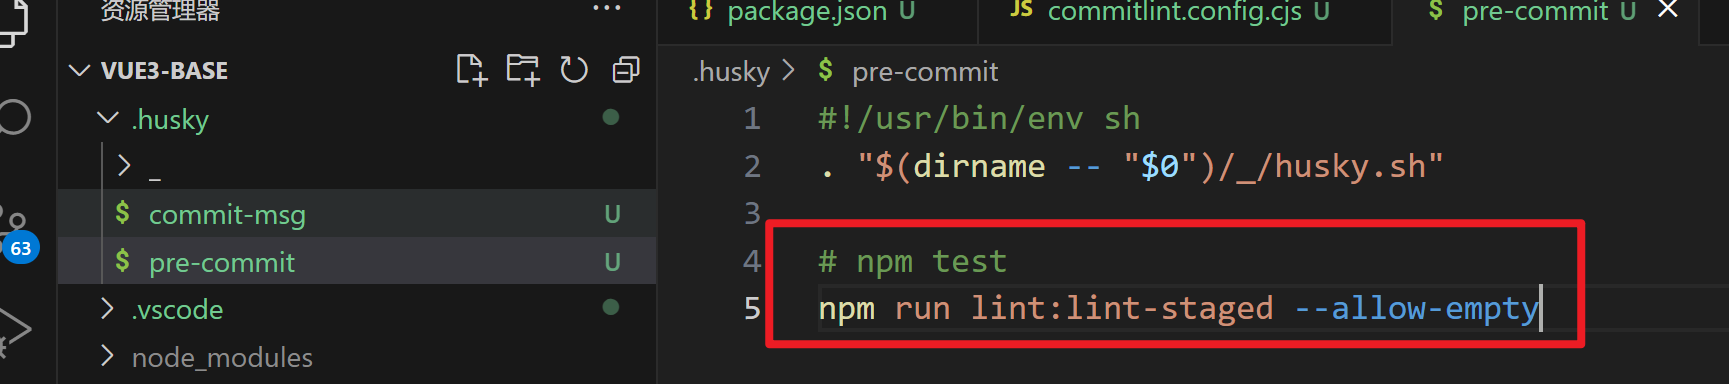
c、文件.husky/pre-commit修改提交前钩子命令

提交的时候执行pre-commit文件中命令,然后触发package.json 中的lint:lint-staged,从而执行lint-staged.config.mjs配置文件去做检测。

1
2
3
4
5
#!/usr/bin/env sh
. "$(dirname -- "$0")/_/husky.sh"

# 添加该命令
npm run lint:lint-staged --allow-empty

image-20240207143016869


8.3、Commitlint 检测提交命名

Commitlint 检查您的提交消息是否符合 Conventional comm it format 规范。– Commitlint 官网

1)安装
1
pnpm i @commitlint/cli @commitlint/config-conventional -D
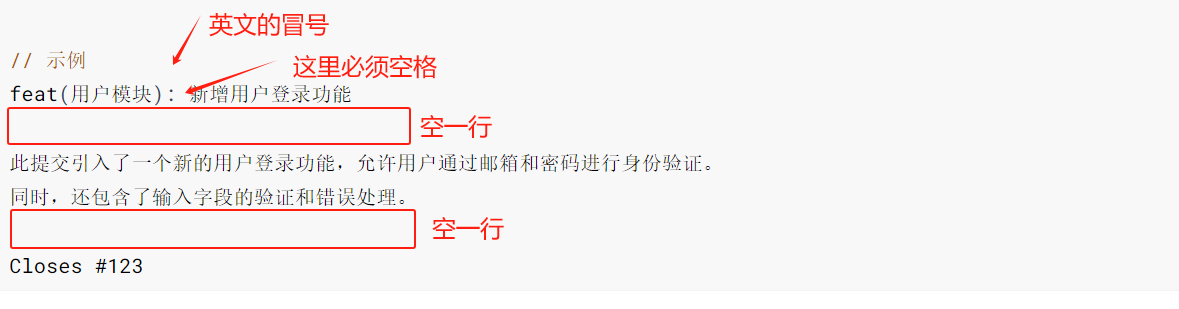
2)语法规范
1
2
3
4
5
6
7
8
9
10
11
12
13
14
// 语法规范
<type>(<scope>): <subject>

<body>

<footer>

// 示例
feat(用户模块): 新增用户登录功能

此提交引入了一个新的用户登录功能,允许用户通过邮箱和密码进行身份验证。
同时,还包含了输入字段的验证和错误处理。

Closes #123

3)语法拆解说明
  1. 头部(Header)
    • <type>: 提交的类型,常见的类型包括:
      • feat: 新增功能
      • fix: 修复缺陷
      • docs: 文档变更
      • style: 代码格式(不影响功能)
      • refactor: 代码重构
      • perf: 性能优化
      • test: 添加测试或改动已有测试
      • build: 构建过程或外部依赖的变更
      • ci: 修改 CI 配置
      • chore: 其他杂项更改
      • revert: 回滚提交
    • <scope>: 可选,表示提交影响的范围(如模块名、文件名等),例如 uiapi。可以用括号括起来。
    • <subject>: 提交的简要描述,建议不超过 50 个字符,使用祈使句(例如:add login feature)。
  2. 正文(Body)
    • 可选,用于详细描述提交的内容和背景。可以包含多行,建议每行不超过 72 个字符。
    • 说明为什么要做这些更改,以及如何解决了问题或实现了功能。
  3. 尾部(Footer)
    • 可选,通常用于引用相关的任务、问题编号或其他重要的元信息。
    • 例如:Closes #123Fixes #456,表示这个提交关闭或修复了特定的问题。

4)注意

image-20250225005214324


5)配置文件

根目录创建 commitlint.config.mjs 配置文件

1
2
3
4
5
6
7
8
9
10
11
12
13
14
15
16
17
18
19
20
21
22
23
24
25
26
27
28
29
30
31
/** @type {import("@commitlint/types").UserConfig} */
export default {
ignores: [(commit) => commit.includes("init")],
extends: ["@commitlint/config-conventional"],
rules: {
"body-leading-blank": [2, "always"],
"footer-leading-blank": [1, "always"],
"header-max-length": [2, "always", 108],
"subject-empty": [2, "never"],
"type-empty": [2, "never"],
"subject-case": [0],
"type-enum": [
2,
"always",
[
"feat", // 新增功能
"fix", // 修复缺陷
"docs", // 文档变更
"style", // 代码格式(不影响功能,例如空格、分号等格式修正)
"refactor", // 代码重构(不包括 bug 修复、功能新增)
"perf", // 性能优化
"test", // 添加疏漏测试或已有测试改动
"build", // 构建流程、外部依赖变更(如升级 npm 包、修改 webpack 配置等)
"ci", // 修改 CI 配置、脚本
"revert", // 回滚 commit
"chore", // 对构建过程或辅助工具和库的更改(不影响源文件、测试用例)
'wip', // 开发中临时提交
],
],
},
};

执行下面命令生成 commint-msg 钩子用于 git 提交信息校验

1
npx husky add .husky/commit-msg "npx --no -- commitlint --edit $1"

image-20240207142542813


9、其他

不使用antfu 直接使用prettier&eslint &styleLint

9.1、prettier

1)安装
1
pnpm i prettier -D
2)配置文件

根目录创建 prettier.config.mjs 配置文件

1
2
3
4
5
6
7
8
9
/**  @type {import('prettier').Config} */
export default {
$schema: "https://json.schemastore.org/prettierrc",
semi: false,
tabWidth: 4,
singleQuote: true,
printWidth: 100,
trailingComma: "es5",
};

9.2、eslint

使用9x版本 扁平化设计 导致很多插件版本滞后

1)安装

脚手架快速安装 然后pnpm i安装相关依赖包(如果创建项目的时候安装了,则不需要安装)

1
pnpm create @eslint/config@latest

额外安装

1
pnpm i eslint-define-config eslint-plugin-import -D
2)配置文件

修改eslint.config.jseslint.config.mjs保持风格统一

1
2
3
4
5
6
7
8
9
10
11
12
13
14
15
16
17
18
19
20
21
22
23
24
25
26
27
28
29
30
31
32
33
34
35
36
37
38
39
40
41
42
43
44
45
46
47
48
49
50
51
52
53
54
55
56
57
58
59
60
61
62
63
64
65
66
67
68
69
70
71
72
73
74
75
76
77
78
79
80
81
82
83
84
import globals from "globals";
import pluginJs from "@eslint/js";
import tseslint from "typescript-eslint";
import pluginVue from "eslint-plugin-vue";
import pluginImport from "eslint-plugin-import";
import { defineFlatConfig } from "eslint-define-config";
// 修复 https://eslint.nodejs.cn/blog/2024/05/eslint-compatibility-utilities/
import { fixupPluginRules } from "@eslint/compat";

export default defineFlatConfig([
// 上面这一大截是官方的
{ files: ["**/*.{js,mjs,cjs,ts,vue}"] },
pluginJs.configs.recommended,
{
languageOptions: { globals: globals.browser },
},
...tseslint.configs.recommended,
...pluginVue.configs["flat/essential"],
{
files: ["**/*.vue"],
languageOptions: {
parserOptions: {
parser: tseslint.parser,
},
},
},
// 这是引入顺序插件
{
files: ["**/*.vue", "**/*.?([cm])ts", "**/*.?([cm])tsx"],
plugins: {
// 修复插件还没升级到9版本
import: fixupPluginRules(pluginImport),
},
rules: {
// 插件还没升级到9x版本
"import/first": "warn",
"import/no-duplicates": "error",
"import/order": [
"error",
{
groups: [
/*
builtin :内置模块,如 path,fs等 Node.js内置模块。
external :外部模块,如 lodash ,react 等第三方库。
internal :内部模块,如相对路径的模块、包名前缀为 @ 的模块。
unknown :未知模块,如模块名没有指定扩展名或模块路径缺失扩展名。
parent :父级目录的模块。
sibling :同级目录的模块。
index :当前目录的 index 文件。
object :使用ES6 导入的模块。
type :使用 import type 导入的模块。
*/
["builtin", "external"],
"internal",
["parent", "sibling"],
"index",
"type",
"object",
"unknown",
],
pathGroups: [
{
pattern: "../**",
group: "parent",
position: "after",
},
{
pattern: "./*.scss",
group: "sibling",
position: "after",
},
],
// 不同组之间是否换行。
// 'newlines-between': 'always',
// 根据字母顺序对每组内的引用进行排序。
alphabetize: {
order: "asc",
caseInsensitive: true,
},
},
],
},
},
]);

10、简化组件命名

正常组件命名

1
2
3
4
5
6
7
8
9
10
11
12
13
<template>
<div class="person"></div>
</template>

<script lang="ts">
export default {
name:'Person',
}
</script>

<!-- 下面的写法是setup语法糖 -->
<script setup lang="ts">
</script>

使用vite-plugin-vue-setup-extend

1
pnpm add vite-plugin-vue-setup-extend -D
1
2
3
4
5
6
7
8
// vite.config.ts

import { defineConfig } from 'vite'
import VueSetupExtend from 'vite-plugin-vue-setup-extend'

export default defineConfig({
plugins: [ VueSetupExtend() ]
})

组件中使用

1
<script setup lang="ts" name="Person"></script>

11、打包环境区分

vite.config.ts

1
2
3
export default defineConfig((res) => {
console.log(res)
}

返回四个参数:

  • mode:当前的运行模式(例如 developmentproduction),没配置env文件默认就只有这两个值。
  • command:当前运行的命令(例如 servebuild),本地运行返回serve,使用打包之后返回的build
  • isSsrBuild:是否在进行服务器端渲染的构建。
  • isPreview:是否在预览模式下运行。

实践可知:

在运行本地项目时:

有无.env文件时,vite.config.ts文件中res返回都是mode="development"command="serve"

在运行打包项目时:

默认无.env文件时,vite.config.ts文件中res返回mode="production"command="build"

.env文件时,根据打包的配置来的 ,如果你打包运行的是.env.sit文件,res返回的则是mode="sit"command="build"

1
2
3
4
5
6
7
8
9
10
11
12
// package.json
{
"scripts": {
"dev": "vite",
"build": "run-p type-check \"build-only {@}\" --",
"build:sit": "npm run build -- sit",
"build:uat": "npm run build -- uat",
"build:prod": "npm run build -- production",
"type-check": "vue-tsc --build",
"build-only": "vite build --mode",
}
}

vite.config.ts 中访问.env文件:

1
2
3
4
5
6
7
import process from 'node:process'
import { defineConfig, loadEnv } from 'vite'

export default defineConfig(({ mode }) => {
const env = loadEnv(mode, process.cwd())
console.log(env)
}
1
2
3
4
5
6
7
8
9
10
11
// .env
VITE_NODE_ENV = 'local'

// .env.sit
VITE_NODE_ENV = 'sit'

// .env.uat
VITE_NODE_ENV = 'sit'

// .env.product
VITE_NODE_ENV = 'production'

12、添加基准路径

1
2
3
4
5
6
7
8
9
// router/index.ts
import { createRouter, createWebHistory } from 'vue-router'

const router = createRouter({
history: createWebHistory('/pc/'),
routes: [],
})

export default router
1
2
3
4
5
6
7
8
// vite.config.ts
import { defineConfig } from 'vite'

export default defineConfig(({ mode }) => {
return {
base: env.VITE_BASE_URL,
}
})

13、添加打包的dist文件预览配置

1
2
3
4
5
6
// package.json
{
"scripts": {
"preview": "vite preview",
}
}

14、本地代理服务配置

官网https://cn.vitejs.dev/config/server-options.html#server-proxy

vite.config.ts配置

1
2
3
4
5
6
7
8
9
10
11
12
13
14
15
16
17
export default defineConfig({
server: {
// 监听所有公共ip
host: '0.0.0.0',
cors: true, // 允许所有来源访问本地开发服务器的资源
port: 3300,
proxy: {
'/api': { // 代理前缀
// 转发地址 前端请求http://localhost:3000/api/users代理后实际请求 http://www.example.com/users
target: 'http://www.example.com',
changeOrigin: true, // 修改 Origin 头为目标地址
// 移除路径中开头的 /api 前缀 例如:/api/users → /users
rewrite: (path: string) => path.replace(/^\/api/, ''),
},
},
},
})

参数解析

cors和changeOrigin

vite.config.ts 中,cors: truechangeOrigin: true 用于解决不同场景下的跨域问题,具体区别如下:

1、cors: true

  • 作用:配置开发服务器(Vite Dev Server)的 CORS 响应头,允许浏览器跨域访问本地开发服务器的资源。
  • 实现方式
    当设置为 true 时,Vite 会默认添加 Access-Control-Allow-Origin: * 响应头,允许所有来源的请求。若需更精细控制(如指定允许的域名),可通过 CorsOptions 对象配置。
  • 适用场景
    用于本地开发环境,解决前端资源(如静态文件)被其他域名访问时的 CORS 限制。例如,主应用加载微前端子应用的资源时可能需要此配置。

2、changeOrigin: true

  • 作用:在代理请求时修改请求头的 Origin 字段为目标服务器的地址,绕过目标服务器的 CORS 校验。
  • 实现方式
    代理将前端请求的 Origin(如 [http://localhost:3000 ](http://localhost:3000 ))改为目标服务器的域名(如 [https://apiservice.com ](https://apiservice.com )),使目标服务器认为请求来自同源,从而避免 CORS 拦截。
  • 适用场景
    用于代理接口请求,尤其是当前端与后端分离开发时。例如,将 /api 路径的请求代理到 [http://localhost:8080 ],并通过 changeOrigin: true 让后端正常响应。

两者的区别

配置项作用对象核心目的典型使用场景
cors: trueVite 开发服务器允许浏览器跨域访问本地资源微前端资源加载、本地静态服务
changeOrigin: true代理请求绕过目标服务器的 CORS 校验接口代理到不同域的后端服务

注意事项

  • 优先级
    changeOrigin: true 仅影响代理请求的 Origin 头,而 cors: true 影响的是 Vite 开发服务器自身的响应头。两者可同时使用。
  • 生产环境
    cors: true 和代理配置仅在开发环境生效,生产环境需通过后端或 Nginx 配置 CORS。
  • 冲突处理
    若后端强制校验 Origin,需确保 changeOrigin: true 修改后的值与后端允许的域名一致

15、axios二次封装

utils/request.ts

1
2
3
4
5
6
7
8
9
10
11
12
13
14
15
16
17
18
19
20
21
22
23
24
25
26
27
28
29
30
31
32
33
34
35
36
37
38
39
40
41
42
43
44
45
46
47
48
49
50
51
52
53
54
55
56
57
58
59
60
61
62
63
64
65
66
67
68
69
70
71
72
73
74
75
76
import type { AxiosResponse } from 'axios'
import router from '@/router'
import Base from '@/utils/base'
import axios from 'axios'
import dayjs from 'dayjs'

const service = axios.create({
timeout: 30000,
headers: { 'Content-Type': 'application/json;charset=UTF-8' },
})

// request拦截器
service.interceptors.request.use((config: customInternalAxiosRequestConfig) => {
if (config.headersType) {
config.headers['Content-Type'] = config.headersType
}

const base = Base()
base.requestTime = dayjs().format('YYYYDDMMHmmss')
const { params, data } = config
const newParams = { ...(data || params), ...base }
if (params) {
config.params = newParams
} else {
config.data = newParams
}

return config
}, (error) => {
Promise.reject(error)
})

// 响应拦截器
service.interceptors.response.use(
(response: AxiosResponse) => {
const { body, msgCd, msgInfo } = response.data

// 如果响应是二进制流,则直接返回,用于下载文件、Excel 导出等(待测试)
if (response.config.responseType === 'blob') {
return response
}

// 接口请求成功
if (msgCd.slice(-5) === '00000') {
return body
}

// 登录失效
if (msgCd === 'MPL99001') {
if (router.currentRoute.value.name !== 'login') {
router.replace({
name: 'login',
query: { redirect: router.currentRoute.value.fullPath },
})
}
}
// 其他错误
return Promise.reject(msgInfo || '错误')
},
(error) => {
console.log('[ajax error]', error)
let msgInfo = ''
const { message } = error
if (message === 'Network Error') {
msgInfo = '操作失败,网络异常!'
} else if (message.includes('timeout')) {
msgInfo = '接口请求超时,请刷新页面后重试!'
} else if (message.includes('Request failed with status code')) {
msgInfo = `接口请求失败,请稍后重试!${message.substr(message.length - 3)}`
}

return Promise.reject(msgInfo)
},
)

export default service

api/user/index.ts

1
2
3
4
5
6
7
8
9
10
11
12
13
14
15
16
17
18
19
20
21
22
23
24
25
26
27
28
29
30
31
32
33
34
35
36
37
38
39
40
41
import request from '@/utils/request'

class CommonAPI {
/**
* 获取首页信息
* @param data 请求参数,默认为空对象
* @returns 包含首页信息的Promise对象
*/
static homeInformationQuery(data = {}) {
return request<any, HomeInformationQueryResult>({
url: '/fortune-business/v1/common/home-information-query',
method: 'post',
data,
})
}
}

export default CommonAPI

/** 请求参数 */

/** 响应参数 */
export interface HomeInformationQueryResult {
fundInfoList: FundInfoList
newUserFlag: boolean
userSignFlag: boolean
};

export interface FundInfo {
fundDesc: string
fundName: string
fundDayLy: string
fundIcon: string
fundElectronicAccount?: any
fundCorpId: string
fundNo: string
}

// 存储全部基金的数组类型
export type FundInfoList = FundInfo[]

***.vue

1
2
3
4
5
6
7
8
9
10
11
12
13
14
15
16
17
18
19
<template>
<div class=""></div>
</template>

<script setup lang="ts">
import { onMounted } from 'vue'
import UserAPI from '@/api/user'

const login = async () => {
try {
const res = await CommonAPI.homeInformationQuery()
} catch (error) {
console.log(error)
}
}
onMounted(() => {
login()
})
</script>

16、打包分析

插件网站https://www.npmjs.com/package/rollup-plugin-visualizer

1
pnpm add rollup-plugin-visualizer -D

vite.config.ts

1
2
3
4
5
6
7
8
9
10
11
12
13
14
import { defineConfig } from 'vite'
import { visualizer } from 'rollup-plugin-visualizer'

export default defineConfig({
plugins: [
visualizer({
// 注意这里要设置为true,否则无效
open: !!((command === 'build' && mode === 'development')),
filename: 'stats.html', // 分析图生成的文件名
gzipSize: true, // 收集 gzip 大小并将其显示
brotliSize: true, // 收集 brotli 大小并将其显示
}),
],
})

17、gzip压缩

1
pnpm i vite-plugin-compression -D

vite.config.ts

1
2
3
4
5
6
7
8
9
10
11
12
13
14
15
16
17
18
// 压缩gzip
import viteCompression from 'vite-plugin-compression'

// https://vitejs.dev/config/
export default defineConfig({
// ...
plugins: [
// ...
viteCompression({
verbose: true, // 是否在控制台输出压缩结果
disable: false, // 是否禁用压缩
deleteOriginFile: false, // 删除源文件
threshold: 10240, // 文件大小超过此值时进行压缩,单位为字节即10kb
algorithm: 'gzip', // 压缩算法,可选 'gzip' 或 'brotli'
ext: '.gz' // 压缩后的文件扩展名
})
],
})

nginx服务器上还要对应配置

在server节点下新增以下配置

1
2
3
4
5
6
7
8
9
10
11
12
13
14
15
16
17
18
19
20
21
22
23
24
25
26
27
28
29
30
31
32
server {
listen 80;
server_name localhost;

# 追加如下配置
# gzip - 动态压缩配置
gzip on; # 开启gzip压缩
gzip_vary on; # 添加Vary: Accept-Encoding响应头,支持CDN缓存
gzip_proxied any; # 对所有代理请求都进行压缩
gzip_comp_level 6; # 压缩级别6(1-9),平衡压缩率和CPU占用
# 指定哪些 MIME 类型的文件需要压缩
gzip_types text/plain # .txt文本文件
text/css # .css样式文件
text/xml # .xml文件
text/javascript # .js文件(旧MIME类型)
application/json # .json API响应
application/javascript # .js文件(新MIME类型)
application/xml # XML文件
application/xml+rss # RSS订阅
application/rss+xml # RSS订阅
application/atom+xml # Atom订阅
image/svg+xml # .svg矢量图
font/ttf # .ttf字体文件
font/otf # .otf字体文件
font/woff # .woff字体文件(虽然已压缩,但有时仍可获益)
application/x-font-ttf # 字体文件(兼容旧格式)
application/x-javascript; # JS文件(兼容旧格式)

# gzip_static - 使用预先压缩的.gz文件
gzip_static on; # 优先使用构建时生成的.gz文件,提升性能
gzip_min_length 1k; # 小于1KB的文件不压缩
}

如果是打包成docker镜像,Dockerfile可配置如下:

1
2
3
4
5
6
7
8
9
10
11
12
13
14
15
16
17
18
FROM nginx:1.25.2-alpine-slim

COPY dist /usr/share/nginx/html/

# 开启gzip压缩配置
RUN sed -i '/server_name localhost;/a \
gzip on;
gzip_static on;
gzip_buffers 4 16k;
gzip_min_length 1k;
gzip_comp_level 9;
gzip_types text/plain application/javascript application/x-javascript text/css application/xml text/javascript application/x-httpd-php image/jpeg image/gif image/png;
gzip_proxied any;
gzip_vary on;
gzip_disable "MSIE [1-6]";'

# 指定于外界交互的端口
EXPOSE 80

这些配置项的作用如下:

  • gzip on; 启用 Gzip 功能。
  • gzip_static on; 允许 Nginx 直接返回已压缩的静态文件。
  • gzip_types 指定需要压缩的文件类型。
  • gzip_vary on; 添加 Vary: Accept-Encoding 头部,确保浏览器正确处理压缩文件。
  • gzip_comp_level 设置压缩级别,数值越大压缩率越高,但性能消耗也越大(1-9)
  • gzip_buffers 设置缓冲区大小。
  • gzip_http_version 设置 HTTP 版本。
  • gzip_disable 禁用对特定浏览器的 Gzip 压缩。
  • gzip_proxied 用于控制 Gzip 压缩的行为,特别是在处理来自代理服务器的请求时。any: 对所有请求(包括来自代理的请求)执行 Gzip 压缩

18、图片压缩

插件网站vite-plugin-image-optimizer (弃用)

1
2
pnpm add vite-plugin-image-optimizer -D
pnpm add sharp -D

vite.config.ts

1
2
3
4
5
6
7
8
9
10
11
12
13
14
15
16
17
18
19
20
21
import { defineConfig } from 'vite'
import { ViteImageOptimizer } from 'vite-plugin-image-optimizer'

export default defineConfig({
plugins: [
ViteImageOptimizer({ // 图片压缩
png: {
quality: 80,
},
jpeg: {
quality: 80,
},
jpg: {
quality: 80,
},
webp: {
quality: 60,
}
}),
],
})

插件网站vite-plugin-image-tools(推荐)

vite插件,支持图片压缩和自动转webp,目前只支持’png’, ‘jpg’, ‘webp’, ‘avif’, ‘tiff’, ‘gif’

1
2
pnpm add -D vite-plugin-image-tools
pnpm add spritesmith -D

vite.config.ts

1
2
3
4
5
6
7
8
9
10
11
12
13
14
15
import { defineConfig } from 'vite'
import VitePluginImageTools from 'vite-plugin-image-tools'

export default defineConfig({
plugins: [
VitePluginImageTools({
quality: 80, // 图片质量
enableWebp: true, // 开启webp转换
limitSize: 10 * 1024, // 小于10KB不做任何压缩转换处理(10KB = 10 * 1024 bytes)
webpConfig: {
deleteOriginImg: true, // 打包时删除原图,减少产物体积
},
})
]
})

参数

参数类型默认值Description
qualitynumber80图片质量 (1-100)
includesstring/RegExp‘’xxx.png'.includs(inclouds) includes.test('xxx.png')jpe?g
excludesstring/RegExp‘’排除项,如:!’xxx.png'.includs(inclouds) !includes.test('xxx.png')
filterfunction() => true过滤方法,可自定义过滤图片逻辑,支持async 参数:图片路径 如: filter: (path) => { return path.includes(‘.png’) }
compatibilitybooleanfalse是否兼容低版本浏览器,生产环境生效, true:只有css中的图片会转webp(暂时只支持打包时候处理css) false:全部转webp
bodyWebpClassNamestringwebpbody标签的webp class,用于生成兼容webp的class
enableWebpbooleanfalse生产环境是否转webp
enableDevbooleanfalse开发环境是否开启压缩
enableDevWebpbooleanfalse开发环境是否开启转webp
cacheDirstring‘node_modules/.cache/vite-plugin-image’缓存路径, 默认,只在开发环境生效
sharpConfigObject{ jpeg?: JpegOptions, jpg?: JpegOptions, png?: PngOptions, webp?: WebpOptions, avif?: AvifOptions, tiff?: TiffOptions, gif?: GifOptions}sharp配置
svgoConfigObject{plugins:[‘preset-default’,{name:’removerXMLNS’},{name:’removeViewBox’}],js2svg:{indent:2, pretty: true}}https://svgo.dev/docs/preset-default/

结论
vite-plugin-image-tools 默认不会删除原图,这是有意设计(兼容性考虑)。
如果你确定不需要原图,可以写 Node 脚本删除原图(不建议删除)

1
2
3
4
5
6
7
8
9
10
11
12
13
14
15
16
17
18
19
20
21
22
23
24
25
26
27
28
29
30
31
32
33
34
35
36
37
// vite.config.ts
import fs from 'fs'
import path from 'path'

const removeOriginalImages = () => {
return {
name: 'remove-original-images',
closeBundle() {
const outDir = path.resolve(__dirname, 'dist') // 输出目录
const extsToRemove = ['.png', '.jpg', '.jpeg']
const stack = [outDir]

while (stack.length) {
const dir = stack.pop()!
const files = fs.readdirSync(dir)

for (const file of files) {
const fullPath = path.join(dir, file)
const stat = fs.statSync(fullPath)
if (stat.isDirectory()) {
stack.push(fullPath)
} else if (extsToRemove.includes(path.extname(fullPath).toLowerCase())) {
fs.unlinkSync(fullPath)
}
}
}
console.log('已删除原始图片文件')
}
}
}

export default {
plugins: [
// 你的其他插件
removeOriginalImages()
]
}

19、解决ts无法识别路由中导入的vue组件

env.d.ts

1
2
3
4
5
6
declare module '*.vue' {
import type { DefineComponent } from 'vue'

const component: DefineComponent
export default component
}

20、将路由和pinia分离到独立模块

将路由和pinia分离到独立模块,提高可维护性和可扩展性

/src/plugins/index.ts

1
2
3
4
5
6
7
8
9
10
11
12
import type { App } from 'vue'
import { setupRouter } from '@/router'
import { setupStore } from '@/store'

export default {
install(app: App) {
// 路由(router)
setupRouter(app)
// 状态管理(store)
setupStore(app)
},
}

src/router/index.ts

1
2
3
4
5
6
7
8
9
10
11
12
13
14
15
16
17
18
import type { App } from 'vue'
import { createRouter, createWebHistory } from 'vue-router'

const router = createRouter({
history: createWebHistory(import.meta.env.VITE_BASE_URL),
routes: [
{
path: '/',
name: 'home',
component: () => import('@/views/home/index.vue'),
meta: { requiresAuth: true, title: '首页' },
},
],
})

export const setupRouter = (app: App) => {
app.use(router)
}

src/store/index.ts

1
2
3
4
5
6
7
8
9
import type { App } from 'vue'
import { createPinia } from 'pinia'

const pinia = createPinia()

// 全局注册 store
export function setupStore(app: App) {
app.use(pinia)
}

src/main.ts

1
2
3
4
5
6
7
import plugins from '@/plugins'
import { createApp } from 'vue'
import App from './App.vue'

const app = createApp(App)
app.use(plugins)
app.mount('#app')

21、添加mock工具

1
pnpm add vite-plugin-mock-dev-server -D

vite.config.ts

1
2
3
4
5
6
7
8
import { defineConfig } from 'vite'
import mockDevServerPlugin from 'vite-plugin-mock-dev-server'

export default defineConfig({
plugins: [
env.VITE_MOCK_DEV_SERVER === 'true' ? mockDevServerPlugin() : null,
],
})

在项目根目录添加mock文件夹

mock/index.ts

1
2
3
4
5
6
7
import path from 'node:path'
import { createDefineMock } from 'vite-plugin-mock-dev-server'

export const defineMock = createDefineMock((mock) => {
// 拼接url
mock.url = path.join(mock.url)
})

tsconfig.app.

1
2
3
4
5
6
{
"include": [
"mock/**/*.ts",
],
}

mock/modules/home.mock.ts

这里命名中间一定要用mock,格式xxx.mock.ts

1
2
3
4
5
6
7
8
9
10
11
12
13
14
15
16
17
18
19
20
21
22
23
24
25
26
27
28
29
30
import { defineMock } from '../index'

export default defineMock([
{
// 获取首页信息
url: '/fortune-business/v1/common/home-information-query',
method: ['POST'],
body: {
msgCd: '00000',
mockFlag: true,
msg: '交易成功',
body: {
newUserFlag: false, // 是否新用户
userSignFlag: true, // false需要用户签隐私协议
fundInfoList: [
{
funType: '稳健理财',
fundDesc: '稳健理财你真棒',
fundName: '汇添富和聚宝货币市场基金',
fundDayLy: '4.26',
fundIcon: '11',
fundElectronicAccount: null,
fundCorpId: 'MS-BANK',
fundNo: '000600',
},
],
},
},
},
])

22、添加ESLint配置检查器 启动项

package.json

1
2
3
"scripts": {
"eslint-config-inspector": "pnpm dlx eslint --inspect-config",
},

23、添加404页

src/router/index.ts

1
2
3
4
5
6
7
8
9
10
11
12
13
14
15
16
17
import type { App } from 'vue'
import { createRouter, createWebHistory } from 'vue-router'

const router = createRouter({
history: createWebHistory(import.meta.env.VITE_BASE_URL),
routes: [
{
path: '/:pathMatch(.*)*', // Vue3 的写法,兼容子路径
component: () => import('@/views/404.vue'),
meta: { requiresAuth: false, title: '中国移动支付-404' },
},
],
})

export const setupRouter = (app: App) => {
app.use(router)
}

24、引用scss文件

添加scss文件

src/styles/common.scss

src/styles/mixin.scss

src/styles/variables.scss

vite.config.ts

1
2
3
4
5
6
7
8
9
10
11
12
13
14
import { defineConfig } from 'vite'

export default defineConfig(({ mode, command }) => {
css: {
// css预处理器
preprocessorOptions: {
scss: {
additionalData: `
@use "@/styles/variables.scss" as *;
@use "@/styles/mixin.scss" as *;`,
},
},
},
})

25、打包拆分 小图片转base64

1
pnpm add terser -D

vite.config.ts

1
2
3
4
5
6
7
8
9
10
11
12
13
14
15
16
17
18
19
20
21
22
23
24
25
26
27
28
29
30
31
32
33
34
35
36
37
38
39
40
41
42
43
44
45
46
47
48
49
50
51
52
53
54
55
56
57
58
59
60
61
62
63
64
65
66
67
export default defineConfig(({ mode, command }) => {
build: {
assetsInlineLimit: 1024 * 10, // 10kb以下,转Base64
chunkSizeWarningLimit: 2000, // 消除打包大小超过500kb警告
minify: 'terser', // Vite 2.6.x 以上需要配置 minify: "terser", terserOptions 才能生效
terserOptions: {
compress: {
keep_infinity: true, // 防止 Infinity 被压缩成 1/0,这可能会导致 Chrome 上的性能问题
drop_console: mode === 'production', // 生产环境去除 console
drop_debugger: true, // 生产环境去除 debugger
},
format: {
comments: false, // 删除注释
},
},
rollupOptions: {
output: {
// 每个node_modules模块分成一个js文件
manualChunks(id: string) {
if (id.includes('node_modules')) {
const packageName = id.toString().split('node_modules/.pnpm/')[1].split('/')[0].toString()

// 1.第三方依赖合并在一起
// return 'vendor'

// 2.把第三方依赖单独抽离出来
// return packageName

// 3.将较大型或常用的第三方库单独打包
if (packageName.includes('pinia')) {
return 'pinia'
}
if (packageName.includes('axios')) {
return 'axios'
}
if (packageName.includes('dayjs')) {
return 'dayjs'
}
if (packageName.includes('bowser')) {
return 'bowser'
}
if (packageName.includes('vue-router')) {
return 'vue-router'
}
if (packageName.includes('vue')) {
return 'vue'
}
return 'vendor' // 其他第三方依赖合并在一起
}
return undefined
},
entryFileNames: 'js/[name].[hash].js',
chunkFileNames: 'js/[name].[hash].js',
assetFileNames: (assetInfo: any) => {
const info = assetInfo.name.split('.')
let extType = info[info.length - 1]
if (/\.(?:png|jpe?g|gif|svg|webp)(?:\?.*)?$/.test(assetInfo.name)) {
extType = 'img'
} else if (/\.(?:mp4|webm|ogg|mp3|wav|aac)(?:\?.*)?$/i.test(assetInfo.name)) {
extType = 'media'
}
return `${extType}/[name].[hash].[ext]`
},
},
},
},
})

26、添加Vconsole打印

1
pnpm add vite-plugin-vconsole vconsole -D

vite.config.ts

1
2
3
4
5
6
7
8
9
10
11
12
13
14
15
16
import { defineConfig } from 'vite'
import viteVConsole from 'vite-plugin-vconsole'

export default defineConfig({
plugins: [
viteVConsole({
entry: [path.resolve('src/main.ts')], // 项目入口文件 [[1, 6]]
enabled: mode !== 'production', // 根据环境启用 [[3, 6]]
localEnabled: true, // 本地开发时强制启用 [[6]]
config: {
theme: 'dark', // 主题配置
maxLogNumber: 1000, // 日志数量限制
},
}),
]
})

27、简化SVG使用

插件网站https://www.npmjs.com/package/vite-svg-loader

1
pnpm add vite-svg-loader -D

vite.config.ts

1
2
3
4
5
6
7
8
9
10
11
12
13
14
15
import { defineConfig } from 'vite'
import svgLoader from 'vite-svg-loader'

export default defineConfig({
plugins: [
svgLoader({
// 'url': img标签引入 'raw':demo元素 v-html引入 'component': 组件展示
defaultImport: 'url',
svgo: true, // 启用SVGO优化
svgoConfig: {
multipass: false, // 关闭对SVG文件进行多次优化迭代(更彻底地压缩 SVG,会增加处理时间)
},
}),
],
})
1
2
// env.d.ts 模块声明
/// <reference types="vite-svg-loader" />

.vue文件使用

1
2
3
4
5
6
7
8
9
10
11
12
13
14
<template>
<!-- defaultImport: 'url' -->
<img w100 :src="logo" alt="">

<!-- defaultImport: 'raw' -->
<div w100 v-html="logo" />

<!-- defaultImport: 'component' -->
<logo w100 />
</template>

<script setup lang="ts">
import logo from '@/assets/logo.svg'
</script>

28、px转换

cnjm-postcss-px-to-viewport

px转vw/vh

插件网站https://www.npmjs.com/package/cnjm-postcss-px-to-viewport

1
pnpm add cnjm-postcss-px-to-viewport -D

vite.config.ts

1
2
3
4
5
6
7
8
9
10
11
12
13
14
15
16
17
18
19
20
21
22
23
24
25
26
27
28
29
30
31
32
33
34
35
import { defineConfig } from 'vite'
import px2viewport from 'cnjm-postcss-px-to-viewport'

// https://vite.dev/config/
export default defineConfig(({ mode }) => {
return {
css: {
postcss: {
plugins: [
px2viewport({
unitToConvert: 'px', // 要转化的单位
viewportWidth: 750, // UI设计稿的宽度
unitPrecision: 6, // 转换后的精度,即小数点位数
propList: ['*'], // 指定转换的css属性的单位,*代表全部css属性的单位都进行转换
viewportUnit: 'vw', // 指定需要转换成的视窗单位,默认vw
fontViewportUnit: 'vw', // 指定字体需要转换成的视窗单位,默认vw
selectorBlackList: ['ignore'], // 指定不转换为视窗单位的类名,
minPixelValue: 1, // 默认值1,小于或等于1px则不进行转换
mediaQuery: true, // 是否在媒体查询的css代码中也进行转换,默认false
replace: true, // 是否转换后直接更换属性值
exclude: [], // 设置忽略文件,用正则做目录名匹配
landscape: false, // 是否处理横屏情况
// 如果没有使用其他的尺寸来设计,下面这个方法可以不需要, 这个自定义的方法是针对处理vant组件下的设计稿为375问题
customFun: ({ file }: { file: string }) => {
const designWidth = path.join(file).includes(path.join('node_modules', 'vant'))
? 375
: 750
return designWidth
},
}),
],
},
},
}
})

在 TypeScript 中,declare module 用于声明一个模块的类型定义,通常在以下情况下使用:

  1. 没有类型定义文件的第三方库:如果你正在使用一个第三方库(如 cnjm-postcss-px-to-viewport),但该库没有提供官方的类型定义文件(例如 .d.ts 文件),你可以使用 declare module 来告诉 TypeScript 这个模块存在,从而避免编译时报错。
  2. 临时解决方案:这是一个临时的声明,通常用于快速解决类型检查问题。它不会为模块提供具体的类型信息,只是告诉 TypeScript 这个模块是有效的。

types/cnjm-postcss-px-to-viewport.d.ts

1
declare module 'cnjm-postcss-px-to-viewport'

tsconfig.node.json

1
2
3
4
5
6
7
{
"extends": "@tsconfig/node22/tsconfig.json",
"compilerOptions": {
"types": ["node", "./types/vite.config.d.ts"],
},
"include": []
}

declare module ‘cnjm-postcss-px-to-viewport

这行代码的意思是:

  • 声明一个名为 'cnjm-postcss-px-to-viewport' 的模块。
  • TypeScript 不会对该模块的导入进行类型检查。
  • 你可以在项目中导入并使用这个模块,但它的类型是 any,即没有具体的类型信息。

vite-plugin-px2rem

px转rem

插件网站https://www.npmjs.com/package/vite-plugin-px2rem#vite-plugin-px2rem

1
pnpm add vite-plugin-px2rem -D

vite.config.ts

1
2
3
4
5
6
7
8
9
10
import { defineConfig } from 'vite'

export default defineConfig({
plugins: [
px2rem({
width: 750,
rootFontSize: 16,
}),
],
})

29、预构建的依赖项

强制预构建的依赖项,在开发服务器启动时,Vite 会预先处理这些库,以确保它们快速加载和解析

1
2
3
4
5
6
7
8
9
10
11
12
13
14
import { defineConfig } from 'vite'

export default defineConfig({
plugins: [],
optimizeDeps: {
include: [
'vue',
'vue-router',
'pinia',
'axios',
'@vueuse/core',
],
},
})

30、计算白屏时间

白屏时间(First Paint Time)是一个非常重要的指标。它指的是从用户输入网址并按下回车键,到浏览器开始渲染页面内容的时间段。在这段时间内,用户看到的只是一个空白页面,因此白屏时间的长短直接影响了用户的体验。

30.1、什么是白屏时间?

白屏时间是指从用户发起页面请求到浏览器首次开始渲染页面内容的时间。具体来说,白屏时间包括以下几个阶段:

  1. DNS解析:浏览器将域名解析为IP地址。
  2. 建立TCP连接:浏览器与服务器建立TCP连接(三次握手)。
  3. 发起HTTP请求:浏览器向服务器发送HTTP请求。
  4. 服务器响应:服务器处理请求并返回响应数据。
  5. 浏览器解析HTML:浏览器解析HTML文档并构建DOM树。
  6. 浏览器渲染页面:浏览器根据DOM树和CSSOM树生成渲染树,并开始渲染页面。
  7. 页面展示第一个标签:浏览器首次将页面内容渲染到屏幕上。

白屏时间的长短直接影响了用户对网站的第一印象。如果白屏时间过长,用户可能会感到不耐烦,甚至直接关闭页面。因此,优化白屏时间是前端性能优化的重要目标之一。


30.2、白屏时间的影响因素

白屏时间的长短受到多种因素的影响,主要包括以下几个方面:

  1. 网络性能:网络延迟、带宽、DNS解析时间等都会影响白屏时间。如果网络状况不佳,DNS解析和TCP连接建立的时间会变长,从而导致白屏时间增加。
  2. 服务器性能:服务器的响应速度、处理能力等也会影响白屏时间。如果服务器响应缓慢,浏览器需要等待更长的时间才能接收到HTML文档。
  3. 前端页面结构:HTML文档的大小、复杂度、外部资源的加载顺序等都会影响白屏时间。如果HTML文档过大或包含大量外部资源,浏览器需要更长的时间来解析和渲染页面。
  4. 浏览器性能:浏览器的渲染引擎性能、缓存机制等也会影响白屏时间。不同浏览器的渲染性能可能存在差异,导致白屏时间不同。
1
2
3
4
5
6
7
8
9
10
11
12
13
14
15
16
17
18
19
20
21
22
23
24
25
26
27
28
29
30
31
32
33
34
<!doctype html>
<html lang="en">
<head>
<meta charset="UTF-8" />
<meta name="viewport" content="width=device-width, initial-scale=1.0" />
<title>Vite App</title>
</head>
<body>
<div id="app"></div>
<script type="module" src="/src/main.ts"></script>
<script>
// 性能 观察器 观察者模式
const observer = new PerformanceObserver((list) => {
// 获取所有的 性能 指标
const entries = list.getEntries()
for (const entry of entries) {
// body 里的第一个 标签的渲染
// 'first-paint' 表示页面首次开始绘制的时间点,也就是白屏结束的时间点
if (entry.name === 'first-paint') {
const whiteScreenTime = entry.startTime
// 1s=1000ms
console.log(`白屏时间:${whiteScreenTime}ms`)
}
}
})
// 首次绘制 first-paint
// 首次内容绘制 first-contentful-paint 事件
// observe 监听性能指标
// buffered 属性设置为 true,表示包含性能时间线缓冲区中已经记录的相关事件
// 这样即使在创建 PerformanceObserver 之前事件已经发生,也能被捕获到
observer.observe({ type: 'paint', buffered: true })
</script>
</body>
</html>