一、组件与类组件
组件其实就是一段封装了 HTML、CSS、JS 的代码,最终表现为一个自定义标签。
组件都有自己独立的作用域:
React 中的组件分为两大类:
- 类组件(本手册重点)
- 函数组件
2.1、类组件
要将 React 组件定义为类,请继承内置的 Component 类并定义 render 方法:
基本结构
1
2
3
4
5
6
7
8
9
10
11
12
13
14
15
16
| var container = document.getElementById("app");
var root = ReactDOM.createRoot(container);
class Welcome extends React.Component {
render() {
return <div>自定义类组件</div>;
}
}
root.render(<Welcome />);
|
1)关于Fragment
这个空标签被称作 Fragment。React Fragment 允许你将子元素分组,而不会在 HTML 结构中添加额外节点。
类似vue中的<templete></templete>
1
2
3
4
5
6
7
8
9
10
11
12
13
14
15
16
17
18
19
| var container = document.getElementById("app");
var root = ReactDOM.createRoot(container);
let arr = [<h1 key="1">111</h1>, <h1 key="2">222</h1>];
class Welcome extends React.Component {
render() {
return (
<>
<p>1</p>
<p>2</p>
</>
);
}
}
root.render(
<>
<Welcome />
<Welcome />
</>,
);
|
2)props
组件的属性类似于函数的参数,可以让组件接收外面的数据,展现出不同的结果。
props是类组件⾃带的属性,代表所有属性的集合
**注意:**属性不能更改,因为属性是从外部传⼊的并不是组件自己的数据,所有没权利更改。如果想更改只能去修改数据源,让他重新传⼀个新属性。
1
2
3
4
5
6
7
8
9
10
11
12
13
14
| class Welcome extends React.Component {
render() {
let { name } = this.props;
return <h1>hello,{name} </h1>;
}
}
root.render(
<>
<Welcome name="张三" />
<Welcome name="李四" />
<Welcome name="王五" />
<Welcome name="赵六" />
</>,
);
|
a、props.children
类似vue中的插槽
如果在组件标签内写内容,通过props.children读取
如果传⼊单个内容,返回的就是⼀个对象,如果传⼊多个内容的话,返回的就是数组
1
2
3
4
5
6
7
8
9
10
11
12
13
14
15
16
17
18
19
20
21
22
23
24
25
26
27
28
29
30
31
32
33
34
35
36
37
38
39
40
41
42
43
| class Welcome extends React.Component {
render() {
let { children } = this.props;
return (
<>
<h1>一级标题</h1>
{children}
</>
);
}
}
root.render(
<>
<Welcome>
<h3>二级主题</h3>
<p>这是内容</p>
</Welcome>
</>,
);
class Welcome extends React.Component {
render() {
console.log(this.props);
let { children } = this.props;
return (
<>
{children[1]}
<h1>一级标题</h1>
{children[0]}
</>
);
}
}
root.render(
<>
<Welcome>
<h3>二级主题</h3>
<p>这是内容</p>
</Welcome>
</>,
);
|
3)state
- state是属于组件内部私有的,外部无法访问
- state 用于存储组件的动态数据,当组件的 state 更新时,就会执行render函数,组件会重新渲染以更新页面
使用state必须先定义初始值:
1
2
3
4
5
6
7
8
9
10
11
12
13
14
|
constructor() {
super();
this.state = {
num: 1
}
}
state = {
num: 1
}
|
a、何时使用状态?
- 组件中什么东西将来会变化,就把什么东西定义成状态
- 只要修改了状态,组件就会重新渲染
b、state 的使用
1、不能直接修改state,必须采取setState方法去更改
1
2
3
4
5
6
7
8
9
10
11
12
13
14
15
16
17
18
19
20
21
22
23
24
25
26
27
28
| class Welcome extends React.Component {
state = {
num: 1,
};
add = () => {
this.setState((prevState) => ({
num: prevState.num + 1,
}));
};
render() {
const { num } = this.state;
return (
<>
<h1>{num}</h1>
<button onClick={this.add}>点击增加</button>
</>
);
}
}
root.render(
<>
<Welcome />
</>,
);
|
2、数组和对象的更改
对于数组和对象,必须整体替换,即
1
2
3
4
| this.setState({
数组名: 新数组
对象: 新对象
})
|
示例:
1
2
3
4
5
6
7
8
9
10
11
12
13
14
15
16
17
18
19
20
21
22
23
24
25
26
27
28
29
| class Welcome extends React.Component {
state = {
num: 1,
score: ["语文90", "数学99"],
information: {
name: "JACK",
age: 18,
},
};
change = () => {
this.setState({
num: this.state.num + 1,
score: [...this.state.score, "英语59"],
information: { ...this.state.information, links: "唱歌" },
});
};
render() {
const { num, score, information } = this.state;
return (
<>
<h1>{num}</h1>
<p>成绩:{score}</p>
<p>信息:{JSON.stringify(information)}</p>
<button onClick={this.change}>修改</button>
</>
);
}
}
root.render(<Welcome />);
|
3、state的更新可能是异步的(出于性能考虑)
1
2
3
4
5
6
7
8
9
10
11
12
13
14
15
16
17
18
19
20
21
| class Welcome extends React.Component {
state = {
num: 1,
};
change = () => {
this.setState({
num: this.state.num + 1,
});
console.log(this.state.num);
};
render() {
const { num } = this.state;
return (
<>
<h1>{num}</h1>
<button onClick={this.change}>修改</button>
</>
);
}
}
root.render(<Welcome />);
|
如果想同步获取数据,那么可以使用setState的第⼆个参数
1
2
3
4
5
6
7
8
9
10
11
12
13
14
15
16
17
18
19
20
21
22
23
24
25
| class Welcome extends React.Component {
state = {
num: 1,
};
change = () => {
this.setState(
{
num: this.state.num + 1,
},
() => {
console.log(this.state.num);
},
);
};
render() {
const { num } = this.state;
return (
<>
<h1>{num}</h1>
<button onClick={this.change}>修改</button>
</>
);
}
}
root.render(<Welcome />);
|
4、state的更新可能会被合并
连续多次修改state,出于性能考虑,会只执行⼀次。
因为state中的值发生变化render函数就会执行一次,即页面渲染一次。如果这里遍历十次页面渲染十次就会影响性能。
1
2
3
4
5
6
7
8
9
10
11
12
13
14
15
16
17
18
19
20
21
22
23
| class Welcome extends React.Component {
state = {
num: 1,
};
change = () => {
for (let index = 0; index < 10; index++) {
console.log(this.state.num);
this.setState({
num: this.state.num + 1,
});
}
};
render() {
const { num } = this.state;
return (
<>
<h1>{num}</h1> // 页面展示的确是2
<button onClick={this.change}>修改</button>
</>
);
}
}
root.render(<Welcome />);
|
如果不想合并多次更改state的操作,可以通过给setState传入函数的形式,返回新的状态
1
2
3
4
5
6
7
8
9
10
11
12
13
14
15
16
17
18
19
20
21
22
23
24
25
26
27
| class Welcome extends React.Component {
state = {
num: 1,
};
change = () => {
for (let i = 0; i < 10; i++) {
this.setState((prev) => {
console.log(prev.num);
return {
num: prev.num + 1,
};
});
}
};
render() {
const { num } = this.state;
return (
<>
<h1>{num}</h1>
<button onClick={this.change}>修改</button>
</>
);
}
}
root.render(<Welcome />);
|
4)类组件完整结构
1
2
3
4
5
6
7
8
9
10
11
12
13
14
15
16
17
18
19
20
21
22
23
24
| class Qq extends React.Component {
state = {
nickname: "爷傲奈我何",
};
fn = () => {
this.setState({
nickname: "更换数据了",
});
};
render() {
const { nickname } = this.state;
return (
<>
<h1>{nickname}</h1>
<button onClick={this.fn}>点击</button>
</>
);
}
}
|
三、事件处理
3.1、基本语法
- React 事件绑定属性的命名采用驼峰式写法,而不是小写
- 等号后面跟的不是字符串,而是函数名
1
2
3
4
5
6
7
8
9
| class Welcome extends React.Component {
fn() {
alert(1);
}
render() {
return <button onClick={this.fn}>按钮</button>;
}
}
root.render(<Welcome />);
|
3.2、关于this指向问题
1
2
3
4
5
6
7
8
9
10
11
12
13
| class Welcome extends React.Component {
state = {
msg: "我是一个状态",
};
fn() {
console.log(this);
console.log(this.state.msg);
}
render() {
return <button onClick={this.fn}>按钮</button>;
}
}
root.render(<Welcome />);
|
这里的this是undefined
react中的onClick是⼀个自定义的事件名,中间经历过⼀次赋值(onClick={this.fn}),就是把等号后面的函数名赋给了前面的onClick,所以导致this丢失。
以下代码可以演示为什么经历过⼀次赋值,this会丢失:
1
2
3
4
5
6
7
8
9
10
11
12
13
14
15
16
17
18
19
|
"use strict";
let obj = {
display: function () {
console.log(this);
},
};
obj.display();
let obj = {
display: function () {
console.log(this);
},
};
function fn(cb) {
cb();
}
fn(obj.display);
|
3.3、如何解决this丢失的问题?
1)在构造器中绑定this
1
2
3
4
5
6
7
8
9
10
11
12
13
14
15
16
17
| class Welcome extends React.Component {
constructor() {
super();
this.fn = this.fn.bind(this);
}
state = {
msg: "我是一个状态",
};
fn() {
console.log(this);
console.log(this.state.msg);
}
render() {
return <button onClick={this.fn}>按钮</button>;
}
}
root.render(<Welcome />);
|
2)调用的时候绑定
1
| <button onClick={this.fn.bind(this)}>按钮</button>
|
3)使用箭头函数(最推荐)
1
2
3
4
5
6
7
8
9
10
11
12
13
14
| class Welcome extends React.Component {
state = {
msg: "我是一个状态",
};
fn = () => {
console.log(this);
console.log(this.state.msg);
};
render() {
return <button onClick={this.fn}>按钮</button>;
}
}
root.render(<Welcome />);
|
3.4、函数参数的传递
注意一定不能直接写 函数名(),这种是函数调用语句。
React 中的事件后面跟的是函数名或者函数体(匿名函数)。
1)传入匿名函数的形式
1
2
3
4
5
6
7
8
9
10
11
12
13
14
15
16
17
18
19
20
| class Welcome extends React.Component {
state = {
msg: "我是一个状态",
};
fn = (val) => {
console.log(val);
};
render() {
return (
<button
onClick={() => {
this.fn(66);
}}
>
按钮
</button>
);
}
}
root.render(<Welcome />);
|
2)bind的方式
1
| <button onClick={this.fn.bind(this, 5)}>按钮</button>
|
3)案例
1
2
3
4
5
6
7
8
9
10
11
12
13
14
15
16
17
18
19
20
21
22
23
24
25
26
27
28
| class Welcome extends React.Component {
state = {
bgColor: "rgb(255,255,255)",
};
fn = () => {
const r = Math.floor(Math.random() * 256);
const g = Math.floor(Math.random() * 256);
const b = Math.floor(Math.random() * 256);
this.setState({
bgColor: `rgb(${r},${g},${b})`,
});
};
render() {
const box = {
width: "100px",
height: "100px",
border: "1px solid #ccc",
background: this.state.bgColor,
};
return (
<>
<div style={box}></div>
<button onClick={this.fn}>切换</button>
</>
);
}
}
root.render(<Welcome />);
|
四、组件之间的传值
4.1、父传子(props)
1
2
3
4
5
6
7
8
9
10
11
12
13
14
15
16
17
18
19
20
21
22
23
24
25
26
27
28
29
30
31
32
| class Parent extends React.Component {
state = {
msg: "我是父组件的数据",
};
render() {
const { msg } = this.state;
return (
<>
<h1>我是父组件</h1>
<Child a={msg} />
</>
);
}
}
class Child extends React.Component {
render() {
const { a } = this.props;
return (
<>
<h3>我是子组件,{a}</h3>
<GrandChild b={a} />
</>
);
}
}
function GrandChild(props) {
return <h5>我是孙子组件,{props.b}</h5>;
}
root.render(<Parent />);
|
4.2、子传父(回调函数)
1
2
3
4
5
6
7
8
9
10
11
12
13
14
15
16
17
18
19
20
21
22
23
24
25
26
27
28
29
30
31
32
33
34
35
36
37
38
39
| class Parent extends React.Component {
state = {
msg: "",
};
fn = (val) => {
this.setState({
msg: val,
});
};
render() {
return (
<>
<h1>我是父组件, 这是子组件传来的数据:{this.state.msg || "______"}</h1>
<Child fn={this.fn} /> // 1、将fn方法 通过方法传给子组件
</>
);
}
}
class Child extends React.Component {
state = {
msg: "我是子组件的数据",
};
fn1 = () => {
this.props.fn(this.state.msg);
};
render() {
return (
<>
<button onClick={this.fn1}>
我是子组件,点击可将子组件数据传给父组件
</button>
</>
);
}
}
root.render(<Parent />);
|
4.3、案例
1
2
3
4
5
6
7
8
9
10
11
12
13
14
15
16
17
18
19
20
21
22
23
24
25
26
27
28
29
30
31
32
33
34
35
36
37
38
39
40
41
42
43
44
45
46
47
48
49
50
51
52
53
54
| var container = document.getElementById("app");
var root = ReactDOM.createRoot(container);
class Qq extends React.Component {
state = {
nickname: "爷傲奈我何",
show: "none",
};
edit = () => {
this.setState({
show: "block",
});
};
nclose = () => {
this.setState({
show: "none",
});
};
changeName = (nickname) => {
this.setState({
nickname,
});
};
render() {
let { nickname, show } = this.state;
return (
<div className="box">
<h1>{nickname}</h1>
<button onClick={this.edit}>编辑</button>
<Modal
nkname={nickname}
show={show}
nclose={this.nclose}
changeName={this.changeName}
/>
</div>
);
}
}
class Modal extends React.Component {
render() {
let { nkname, show, nclose, changeName } = this.props;
return (
<div className="sbox" style={{ display: show }}>
<h1>{nkname}</h1>
<button onClick={nclose}>关闭弹窗</button>
<button onClick={() => changeName("不吃香菜")}>改名称</button>
</div>
);
}
}
root.render(<Qq />);
|
五、条件渲染
通常你的组件会需要根据不同的情况显示不同的内容。在 React 中,你可以通过使用 JavaScript 的 if 语句、&& 和 ? : 运算符来选择性地渲染 JSX。
5.1、基本写法
1
2
3
4
5
6
7
8
9
10
11
12
13
14
15
16
| var container = document.getElementById("app");
var root = ReactDOM.createRoot(container);
function Welcome(props) {
if (props.flag) {
return <h1>欢迎您尊贵的会员</h1>;
} else {
return <h1>下午好,普通用户</h1>;
}
}
root.render(
<>
<Welcome flag={true} />
<Welcome flag={false} />
</>,
);
|
5.2、可以返回null
1
2
3
4
5
6
7
8
9
10
11
12
13
14
15
16
17
18
| var container = document.getElementById("app");
var root = ReactDOM.createRoot(container);
function Welcome(props) {
if (props.flag) {
return <Vip />;
} else {
return null;
}
}
function Vip() {
return <h1>我是尊贵的vip</h1>;
}
root.render(
<>
<Welcome flag={true} />
<Welcome flag={false} />
</>,
);
|
5.3、&&运算符
1
2
3
4
5
6
7
8
9
| var container = document.getElementById("app");
var root = ReactDOM.createRoot(container);
function Email({ msg }) {
return msg.length > 0 && <h1>你有{msg.length}条消息待处理</h1>;
}
let arr = ["下午吃什么", "晚上吃什么", "明天吃什么"];
root.render(<Email msg={arr} />);
|
5.4、三元表达式
1
2
3
4
5
6
7
8
9
10
11
12
13
| var container = document.getElementById("app");
var root = ReactDOM.createRoot(container);
function Welcome({ flag }) {
return flag ? <Vip /> : <Normal />;
}
function Vip() {
return <h1>我是尊贵的vip</h1>;
}
function Normal() {
return <h1>我是黄金普通用户</h1>;
}
root.render(<Welcome flag={true} />);
|
六、列表渲染
1
2
3
4
5
6
7
8
9
10
11
12
13
14
15
16
17
18
19
20
21
22
23
24
25
26
27
28
29
30
| const container = document.getElementById("app");
const root = ReactDOM.createRoot(container);
function Week({ courseList }) {
return (
<ul>
{courseList.map((item, index) => (
<li key={item.id}>{item.courseName}</li>
))}
</ul>
);
}
const courseList = [
{
id: "1",
courseName: "第一节课",
},
{
id: "2",
courseName: "第二节课",
},
{
id: "3",
courseName: "第三节课",
},
{
id: "4",
courseName: "第四节课",
},
];
root.render(<Week courseList={courseList} />);
|
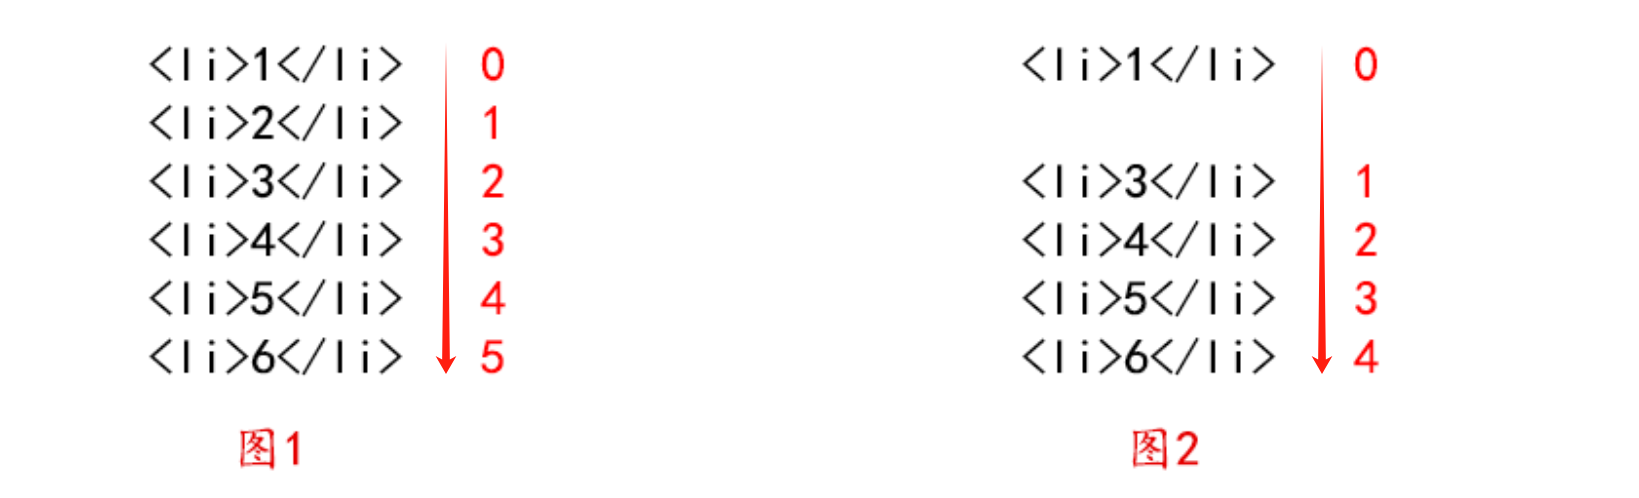
为什么需要key?
key是用来给列表中的每一项做标记,后续更新只更新有差别的部分,不变的部分就不更新
不要用index当key,key要求是独一无二的字符串,一般由后端返回
1
2
3
4
5
6
7
8
9
10
11
12
13
14
15
|
<li>1</li>
<li>2</li>
<li>3</li>
<li>4</li>
<li>1</li>
<li>2</li>
<li>4</li>
<li>3</li>
|
不要用index当key,key要求是独一无二的字符串
1
2
|
如果用索引当key,那么图一列表以此是012345。如果某天将列表第二个删除了(图2),那么是不是列表第一个之后的key全部都发生变化了,原来列表内容3的key是2,现在列表内容3key是1了,这时候需求demo和真实dom一对比,会去更新变化的地方即列表内容2 3 4 5 6的都要去做更新,如果又后端返回一个唯一id值,那么就不存在这种问题
|
七、表单处理
在react中表单的处理通常和其他元素不一样, 正常情况下我们把html中会发上变化的地方都设置为state,然后通过更改state的更新视图
在 HTML 中,表单元素(如<input>、 <textarea> 和 <select>)通常自己维护 state,并根据用户输入进行更新。
而在 React 中,可变状态(mutable state)通常保存在组件的 state 属性中,并且只能通过使用 setState()来更新。
渲染表单的 React 组件还控制着用户输入过程中表单发生的操作。被 React 以这种方式控制取值的表单输入元素就叫做“受控组件”。
7.1、基本使用
1
2
3
4
5
6
7
8
9
10
11
12
13
14
15
16
17
18
19
20
| class Input extends React.Component {
state = {
value: "",
};
handleChange = (e) => {
console.log(e.target.value);
this.setState({
value: e.target.value,
});
};
render() {
return (
<>
<input onChange={this.handleChange} value={this.state.value} />
<p>{this.state.value}</p>
</>
);
}
}
root.render(<Input />);
|
7.2、多个表单元素
1
2
3
4
5
6
7
8
9
10
11
12
13
14
15
16
17
18
19
20
21
22
23
24
25
26
27
28
29
30
31
32
33
34
| const container = document.getElementById("app");
const root = ReactDOM.createRoot(container);
class Input extends React.Component {
state = {
userValue: "",
emailValue: "",
};
handleChange = (e) => {
const name = e.target.name === "user" ? "userValue" : "emailValue";
this.setState({
[name]: e.target.value,
});
console.log(this.state.userValue);
console.log(this.state.emailValue);
};
render() {
return (
<>
<input
onChange={this.handleChange}
value={this.state.userValue}
name="user"
/>
<br />
<input
onChange={this.handleChange}
value={this.state.emailValue}
name="email"
/>
</>
);
}
}
root.render(<Input />);
|
7.3、select、checkbox、radio等特殊元素
1)select用法
1
2
3
4
5
6
7
8
9
10
11
12
13
14
15
16
17
18
19
20
21
22
23
24
| const container = document.getElementById("app");
const root = ReactDOM.createRoot(container);
class Input extends React.Component {
state = {
value: "shanghai",
};
change = (e) => {
this.setState({
value: e.target.value,
});
};
render() {
return (
<>
<select value={this.state.value} onChange={this.change}>
<option value="beijing">北京</option>
<option value="shanghai">上海</option>
<option value="shenzhen">深圳</option>
</select>
</>
);
}
}
root.render(<Input />);
|
2)checkbox用法
操作他的checked属性
1
2
3
4
5
6
7
8
9
10
11
12
13
14
15
16
17
18
19
20
21
22
23
24
25
26
| const container = document.getElementById("app");
const root = ReactDOM.createRoot(container);
class Input extends React.Component {
state = {
isChecked: false,
};
change = (e) => {
this.setState({
isChecked: e.target.checked,
});
};
render() {
return (
<>
<input
type="checkbox"
name="1"
value="beijing"
checked={this.state.isChecked}
onChange={this.change}
/>
</>
);
}
}
root.render(<Input />);
|
3)radio的用法
通过更改value,间接操作checked属性
1
2
3
4
5
6
7
8
9
10
11
12
13
14
15
16
17
18
19
20
21
22
23
24
25
26
27
28
29
30
31
32
33
| const container = document.getElementById("app");
const root = ReactDOM.createRoot(container);
class Input extends React.Component {
state = {
n: "option2",
};
change = (e) => {
this.setState({
n: e.target.value,
});
};
render() {
return (
<>
<input
type="radio"
name="city"
value="option1"
checked={this.state.n == "option1"}
onChange={this.change}
/>
<input
type="radio"
name="city"
value="option2"
checked={this.state.n == "option2"}
onChange={this.change}
/>
</>
);
}
}
root.render(<Input />);
|
八、ref
什么是ref:ref是React提供的用来操纵React组件实例或者DOM元素的接口。
基本跟vue中的ref用法一样 ref拿到的是真实dom
简单来说,就是提供了一种方式能让你直接获取到dom元素对象或者组件实例。
ref不能用于函数组件上(函数组件没有实例),ref只适用于实例对象上,例如class类
8.1、回调形式的ref (老版本推荐)
1)在元素中
1
2
3
4
5
6
7
8
9
10
11
12
13
14
15
16
17
18
19
20
21
22
23
| const container = document.getElementById("app");
const root = ReactDOM.createRoot(container);
class Dome extends React.Component {
test = () => {
console.log(this.ins);
};
render() {
return (
<>
<p
ref={(dom) => {
this.ins = dom;
}}
>
你好啊
</p>
<button onClick={this.test}>测试</button>
</>
);
}
}
root.render(<Dome />);
|
2)在组件中
1
2
3
4
5
6
7
8
9
10
11
12
13
14
15
16
17
18
19
20
21
22
23
24
25
26
27
28
29
30
31
32
33
34
35
36
| const container = document.getElementById("app");
const root = ReactDOM.createRoot(container);
class Dome extends React.Component {
test = () => {
console.log(this.ins);
console.log(this.ins1.state.msg);
this.ins1.fn();
};
render() {
return (
<>
<p
ref={(dom) => {
this.ins = dom;
}}
>
你好啊
</p>
<button onClick={this.test}>测试</button>
<Child ref={(dom) => (this.ins1 = dom)} />
</>
);
}
}
class Child extends React.Component {
state = {
msg: "我是子组件的数据",
};
fn = () => {
console.log(666666666);
};
render() {
return <div>我是子组件</div>;
}
}
root.render(<Dome />);
|
8.2、React.createRef (适用于类组件)
通过在class中使用React.createRef()方法创建一些变量,可以将这些变量绑定到标签的ref中
那么该变量的current则指向绑定的标签dom
1)在元素中
1
2
3
4
5
6
7
8
9
10
11
12
13
14
15
16
17
| const container = document.getElementById("app");
const root = ReactDOM.createRoot(container);
class Demo extends React.Component {
myRef = React.createRef();
fn = () => {
console.log(this.myRef.current);
};
render() {
return (
<>
<p ref={this.myRef}>这是一个组件</p>
<button onClick={this.fn}>按钮</button>
</>
);
}
}
root.render(<Demo />);
|
2)在组件中
1
2
3
4
5
6
7
8
9
10
11
12
13
14
15
16
17
18
19
20
21
22
23
24
25
26
27
28
29
30
31
32
| const container = document.getElementById("app");
const root = ReactDOM.createRoot(container);
class Demo extends React.Component {
myRef = React.createRef();
myRef1 = React.createRef();
fn = () => {
console.log(this.myRef.current);
console.log(this.myRef1.current.state.msg);
this.myRef1.current.childFn();
};
render() {
return (
<>
<p ref={this.myRef}>这是一个组件</p>
<button onClick={this.fn}>按钮</button>
<Child ref={this.myRef1} />
</>
);
}
}
class Child extends React.Component {
state = {
msg: "我是一个子组件数据",
};
childFn = () => {
console.log(6666666);
};
render() {
return <div>我是子组件</div>;
}
}
root.render(<Demo />);
|
8.3、useRef (适用于函数组件)
是一个hooks,后面讲
8.4、综合案例
1
2
3
4
5
6
7
8
9
10
11
12
13
14
15
16
17
18
19
20
21
22
23
24
25
26
27
28
29
30
31
32
33
34
35
36
37
38
39
40
41
42
43
44
45
46
47
48
49
50
51
52
53
54
55
| const container = document.getElementById("app");
const root = ReactDOM.createRoot(container);
class Demo extends React.Component {
myRef = React.createRef();
state = {
value: "",
list: [],
};
change = (e) => {
this.setState({
value: e.target.value,
});
};
add = () => {
if (this.state.value) {
this.setState({
list: [...this.state.list, this.state.value],
value: "",
});
this.myRef.current.focus();
}
};
del = (index) => {
this.state.list.splice(index, 1);
this.setState({
list: [...this.state.list],
});
};
render() {
const { list } = this.state;
return (
<>
<input
value={this.state.value}
onChange={this.change}
ref={this.myRef}
type="text"
/>
<button onClick={this.add}>添加</button>
<ul>
{list.length > 0 &&
list.map((item, index) => (
<li onClick={() => this.del(index)} key={index}>
{item}
</li>
))}
</ul>
</>
);
}
}
root.render(<Demo />);
|
九、脚手架搭建项目
9.1、基于webpack创建项目
基于webpack创建是使用create-react-app搭建项目,Create React App 是一个官方支持的创建 React 单页应用程序的方法。
1)安装
1
2
3
4
5
6
7
8
9
10
|
npm install -g create-react-app
create-react-app my-app
npx create-react-app my-app
cd my-app
npm start
|
npx 是 npm5.2.0版本新增的一个工具包,定义为npm包的执行者,相比 npm,npx 会自动安装依赖包并执行某个命令。
使用npx创建项目,创建的时候会检查电脑是否有create-react-app,没有就安装create-react-app,有就跳过。
2)生成的项目文件解读
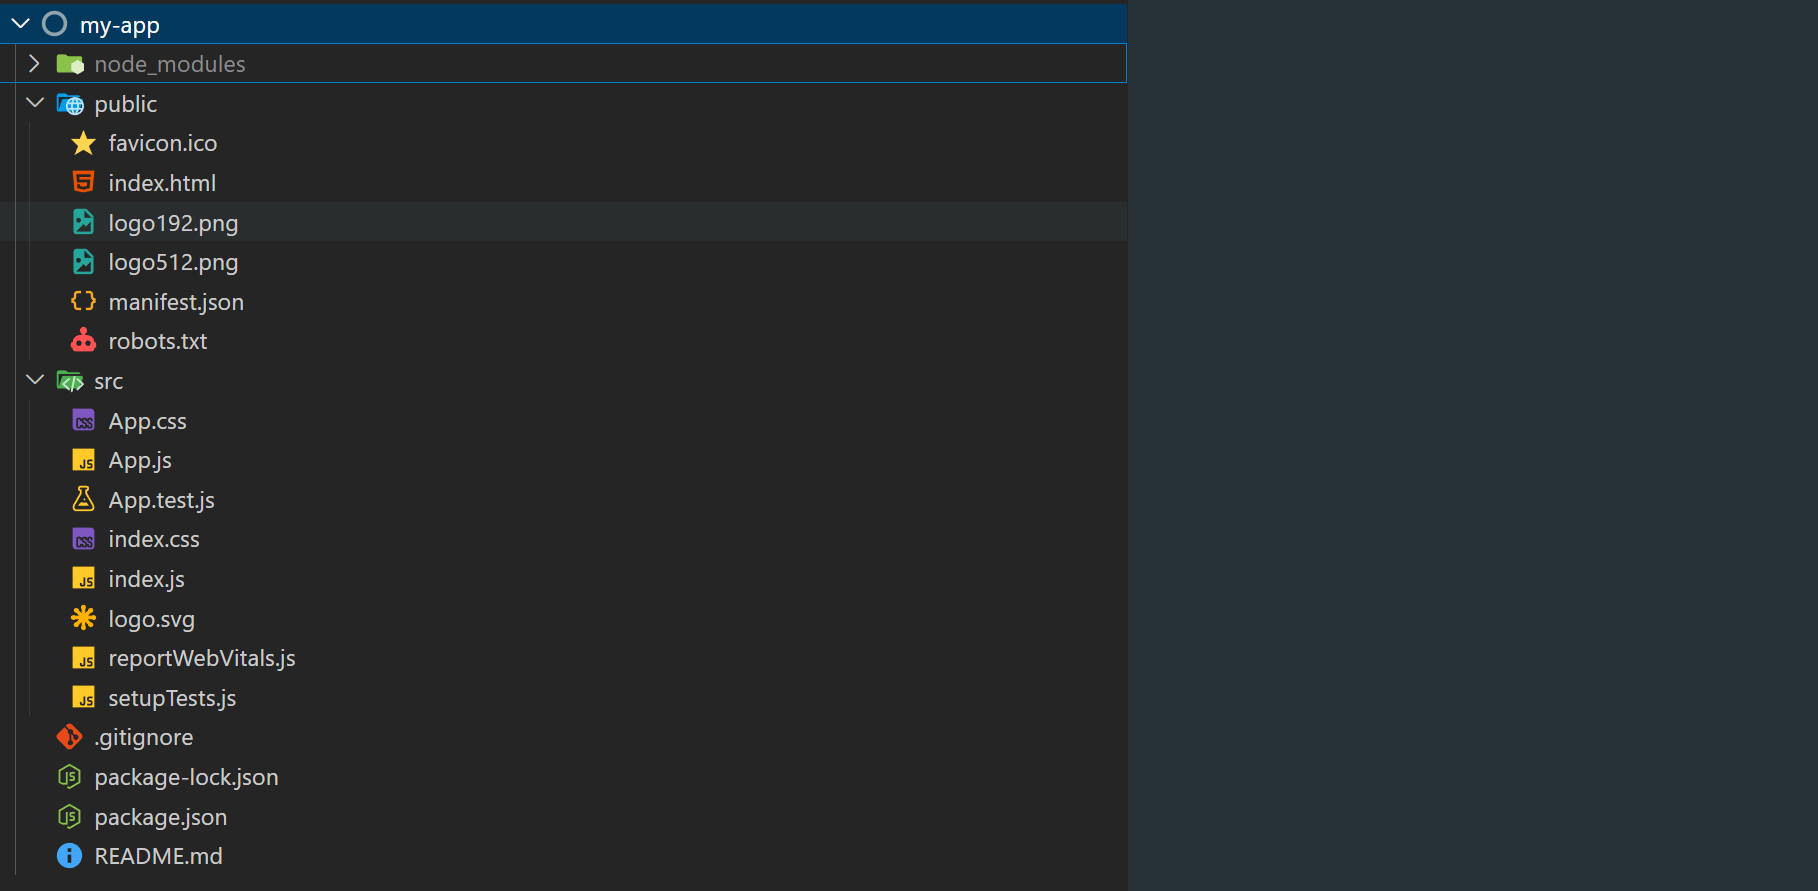
node_modules:项目的核心模块,依赖包
public:存放静态资源文件
- .ico:页签的logo
- index.html:唯一的页面文件,只提供根节点
- manifest.json:移动端的配置一文件
- robots.txt:告诉爬虫者,不可爬的页面,没有实质作用只是警告
.gitignore:声明一些再在git上传的时候需要忽略的文件
package.json:项目的说明文件,有哪些依赖,依赖了哪个版本
package-lock.json:项目依赖的安装包的一些版本会做一些限制,进行版本锁定
Readme.md:作者的一些话
src
- App.css:App组件的样式文件
- App.js 项目的根组件
- App.test.js:自动化测试文件
- index.css全局样式文件
- index.js:项目的入口文件,html只会加载这个js文件(类似vue中main.js)
- reportWebVitals.js:谷歌浏览器退出的一个浏览器性能优化的库
- setupTests:针对index.js的单元测试原件
React.StrictMode的作用
1.识别一些不安全的生命周期
2.检测意外的副作用
3.检测过时的context api
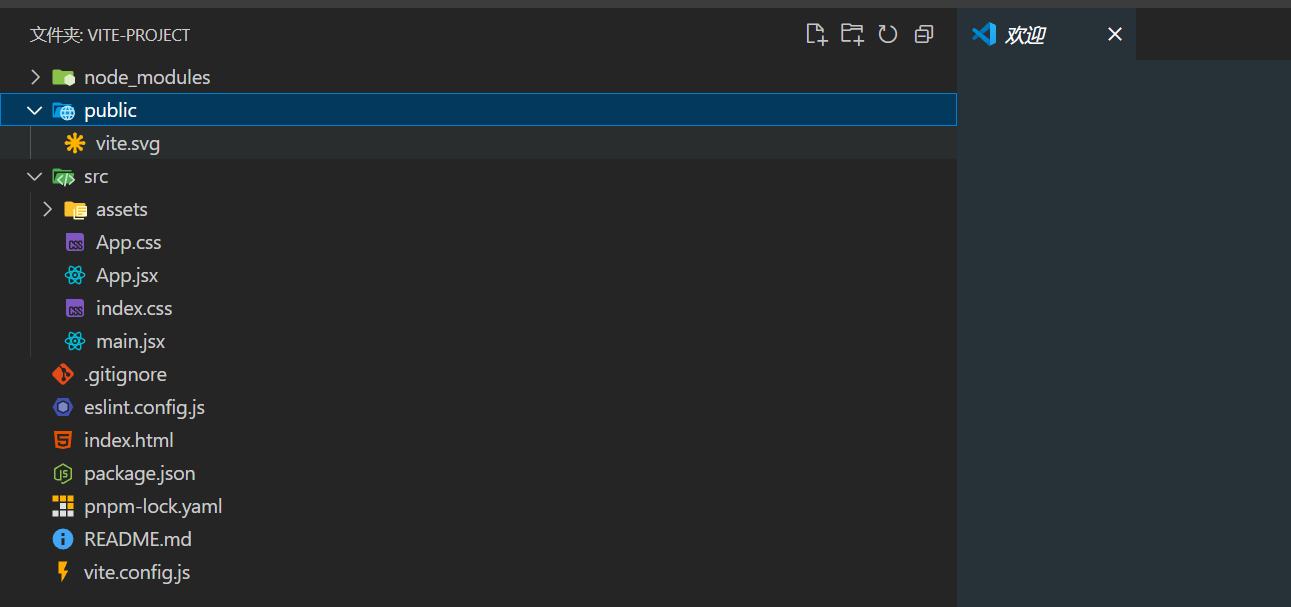
9.2、基于Vite创建项目
node 版本要大于 18 以上,建议用 20 版本,否则运行会报错
使用 NPM:
使用 Yarn:
使用 PNPM:
9.3、项目的基本使用
组件的后缀名我们推荐用jsx,表示是一个组件
普通js后缀名就用.js
默认引入:
引入的时候可以不需要加文件后缀,编辑器会自动查找.jsx后缀的文件,如果找不到,会接着查找后缀为.js的文件
如果直接引入的是文件夹的名字,那么默认去查找该文件夹下的index.jsx文件。
十、模块化样式
10.1、xxx.module.css
只需要将样式文件名字改 :名字.module.css即可
CSS Modules 允许通过自动创建 [filename]_[classname]__[hash] 格式的唯一 classname 来确定 CSS 的作用域,如下
1
2
3
4
5
6
7
8
9
10
11
12
13
| import Child from "./Child";
import style from "./App.module.css";
function App() {
return (
<div>
<h1 className={style.App}>你好</h1>
<h2 className={style.title}>哈哈哈哈哈</h2>
<Child />
</div>
);
}
export default App;
|
10.2、预处理器(Sass/Less/Stylus)
1
2
3
4
5
| $text-color: blue;
.component {
color: $text-color;
font-size: 20px;
}
|
1
2
3
4
5
6
|
import "./Component.scss";
function Component() {
return <div className="component">Styled Text</div>;
}
|
10.3、css-in-js库
使用JS编写CSS的库,如styled-components、emotion等
1
2
3
4
5
6
7
8
9
10
11
|
import styled from "styled-components";
const StyledDiv = styled.div`
color: blue;
font-size: 20px;
`;
function Component() {
return <StyledDiv>Styled Text</StyledDiv>;
}
|
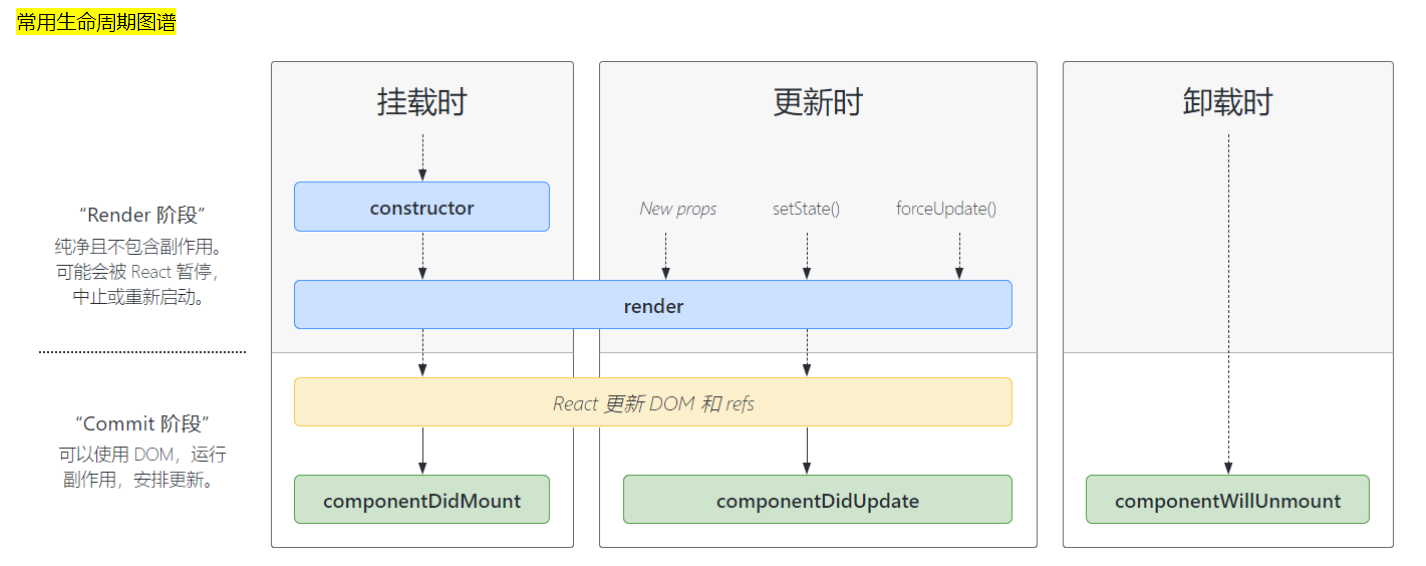
十一、组件的生命周期
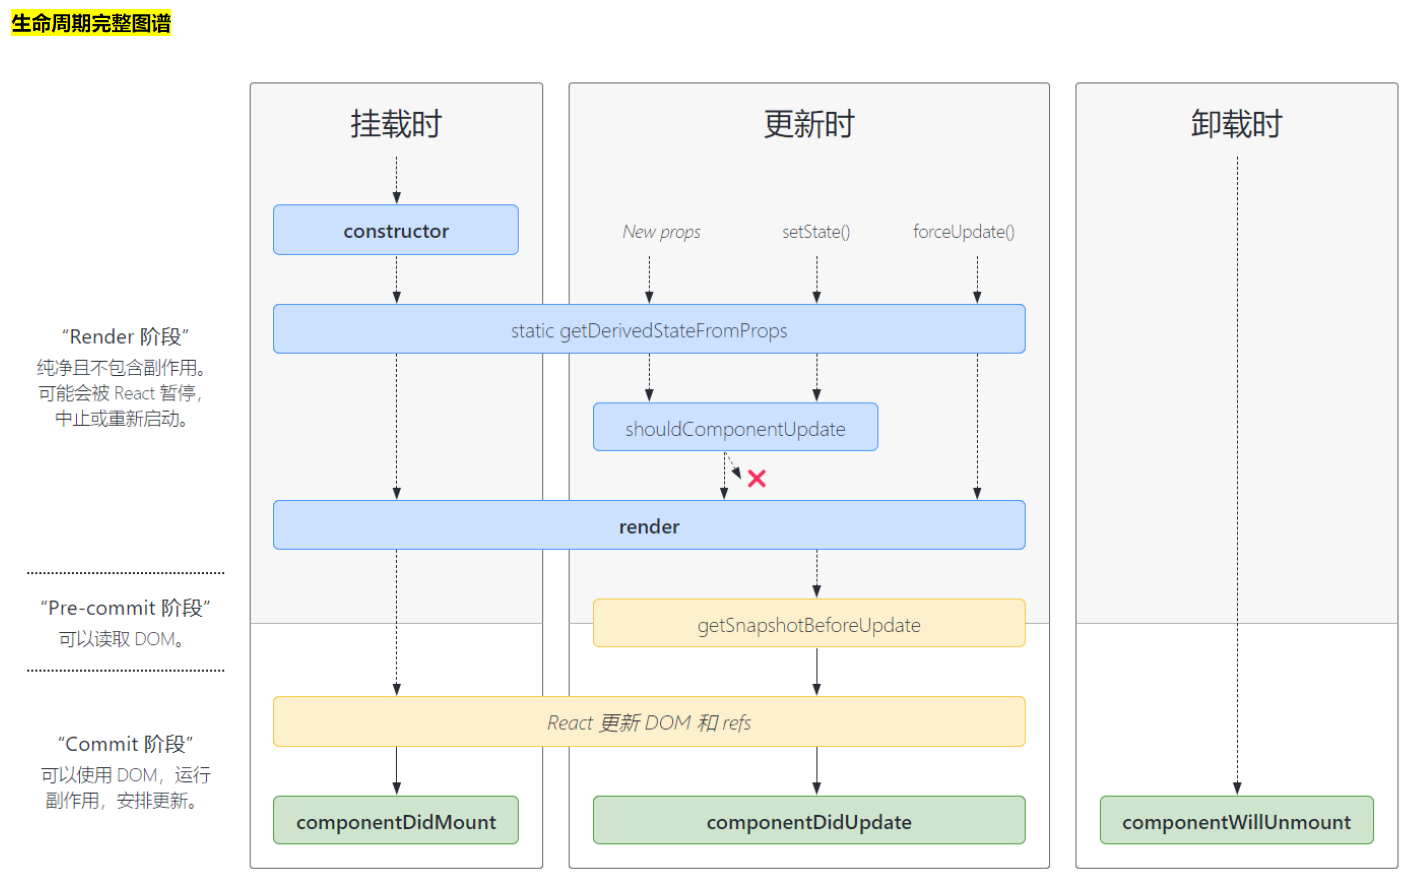
11.1、生命周期图谱
组件的生命周期函数就是在特定时间节点上会自动运行的函数
重点:函数组件没有生命周期
1
2
3
4
5
6
7
8
9
10
11
12
13
14
15
16
17
18
19
20
21
22
23
24
25
26
27
28
29
30
31
32
33
34
35
36
37
38
39
40
41
42
43
44
45
46
47
48
49
| import Child from "./Child";
import React from "react";
class App extends React.Component {
constructor() {
super();
console.log("constructor");
}
state = {
msg: "hello",
info: "hahahaha",
flag: true,
};
componentDidUpdate() {
console.log("componentDidUpdate");
}
componentDidMount() {
console.log("componentDidMount");
}
componentWillUnmount() {
console.log("componentWillUnmount");
}
fn = () => {
this.setState({
flag: false,
});
};
change = () => {
this.setState({
info: "呵呵呵呵",
});
};
render() {
console.log("render");
return (
<div>
<h1>我是App组件{this.state.msg}</h1>
<button onClick={this.fn}>按钮</button>
<button onClick={this.change}>改info</button>
{this.state.flag && <Child />}
</div>
);
}
}
export default App;
|
11.2、shouldComponentUpdate
shouldComponentUpdate 是一个可以在**组件更新之前**触发的生命周期方法,它允许你通过返回一个布尔值来决定一个组件的输出是否受当前状态或属性的改变影响而更新。如果 shouldComponentUpdate 返回 false,那么组件就不会进行更新。
简单来说就是用于更新数据时,如果更新的数据和上一次数据是一样的,理论上应该不需要再次更新组件了,但是实际上确实会更新,使用shouldComponentUpdate 则会避免这种情况,如果shouldComponentUpdate 返回false就说明数据一样,那么组件就不需要更新。
1)基本用法
shouldComponentUpdate 接收两个参数:nextProps 和 nextState,分别表示组件即将接收的新属性和新状态。你需要在这个方法中比较当前组件的属性和状态与新的属性和状态,然后返回一个布尔值来决定组件是否需要更新。
1
2
3
4
5
6
7
| shouldComponentUpdate(nextProps,nextState){
if(nextState.msg===this.state.msg){
return false
}else{
return true
}
}
|
2)案例
1
2
3
4
5
6
7
8
9
10
11
12
13
14
15
16
17
18
19
20
21
22
23
24
25
26
27
28
29
30
31
32
33
34
35
36
|
import React from "react";
class App extends React.Component {
state = {
msg: "hello",
};
fn = () => {
this.setState({
msg: "world",
});
};
shouldComponentUpdate(nextProps, nextState) {
if (nextState.msg === this.state.msg) {
return false;
} else {
return true;
}
}
componentDidUpdate() {
console.log("组件更新了");
}
render() {
console.log("render");
return (
<div>
<h1>我是App组件{this.state.msg}</h1>
<button onClick={this.fn}>按钮</button> // 第二次点击不会执行了
</div>
);
}
}
export default App;
|
自React 16.3版本起,推荐使用 PureComponent(对于类组件) 或 React.memo (对于函数组件) 来进行浅比较,这样可以减少手动编写 shouldComponentUpdate 的需求。
11.3、PureComponent
React.PureComponent 与 React.Component 很相似,两者的区别在于 React.Component 并未实现 shouldComponentUpdate(),而 React.PureComponent 中以浅层对比 prop 和 state 的方式来实现了该函数。
setState存在两个不合理之处:
setState无论是否更新了state,render函数都会重现调用,这是不合理的
如果父组件更新了,无论子组件用没用到父组件的数据也都会重新渲染子组件,这是不合理的
传统的解决方案:
通过生命周期函数shouldComponentUpdate(){}判断两次不一致再更新,否则不更新
1
2
3
4
5
6
7
8
| shouldComponentUpdate(nextProps,nextState){
if(this.props.someprops===nextProps.someprops){
return false
}else{
return true
}
}
|
因此使用PureComponent:
直接将React.Component替换成React.PureComponent
1
2
3
| class Mouse extends React.PureComponent {
}
|
1
2
3
4
5
6
7
8
9
10
11
12
13
14
15
16
17
18
19
20
21
22
23
24
25
26
27
28
|
import React from "react";
class App extends React.PureComponent {
state = {
msg: "hello",
};
fn = () => {
this.setState({
msg: "world",
});
};
componentDidUpdate() {
console.log("组件更新了");
}
render() {
console.log("render");
return (
<div>
<h1>我是App组件{this.state.msg}</h1>
<button onClick={this.fn}>按钮</button>
</div>
);
}
}
export default App;
|
注意:
React.PureComponent 中的 shouldComponentUpdate() 仅作对象的浅层比较。如果对象中包含复杂的数据结构,则有可能因为无法检查深层的差别,产生错误的比对结果。仅在你的 props 和 state 较为简单时,才使用React.PureComponent,或者在深层数据结构发生变化时调用 forceUpdate() 来确保组件被正确地更新。
十二、context多层级传值
Context 提供了一个无需为每层组件手动添加 props,就能在组件树间进行数据传递的方法。
使用步骤
1
2
3
4
5
6
7
8
9
10
11
12
13
14
15
16
17
18
19
20
21
22
23
24
25
26
27
28
29
30
31
32
33
34
35
36
37
38
39
40
41
42
43
44
45
46
47
48
49
50
51
52
53
54
55
56
57
58
59
60
61
62
63
64
65
66
67
68
69
70
71
72
73
74
75
76
77
78
79
|
import React from "react"
const MyContext=React.createContext("");
export default MyContext
import React from "react";
import Child from "./components/Child";
import MyContext from "./utils/context";
class App extends React.PureComponent {
state = {
msg: "父组件数据",
};
render() {
return (
<div>
<MyContext.Provider value={this.state.msg}>
<h1>我是父组件</h1>
<Child msg={this.state.msg}/>
</MyContext.Provider>
</div>
);
}
}
export default App;
import React from 'react'
import MyContext from '../utils/context'
class GrandChild extends React.PureComponent {
render() {
return(
<MyContext.Consumer>
{
(value) => (
<>
<h1>我是孙子组件 </h1>
<p>{value}</p>
</>
)
}
</MyContext.Consumer>
)
}
}
export default GrandChild
可以通过Class.contextType直接将Context对象挂载到class的contextType属性,然后就可以使用this.context对context对象进行使用
contextType属于类的属性,不属于某个实例,所以只能在外部添加或者使用static将其添加给类属性
class GrandChild extends React.PureComponent {
render() {
return(
<>
<h1>我是孙子组件 </h1>
<p>{this.context}</p>
</>
)
}
}
GrandChild.contextType = MyContext;
export default GrandChild
|
十三、高阶组件 (HOC)
高阶组件(Higher-Order Component,简称HOC)是React中用于复用组件逻辑的一种高级技术。本质上,高阶组件是一个函数,它接收一个组件并返回一个新的组件。它主要用于逻辑的共享和重用,而不是直接渲染UI。这种模式类似于JavaScript中的高阶函数,那些以函数为参数或返回一个函数的函数。
- HOC 应当是纯函数,无副作用。
- 不要在 HOC 内部修改原始组件,而是返回一个新组件
- 高阶组件的命名一般以 “with” 开头,表示它是为组件提供附加功能的。
13.1、基本使用
1
2
3
4
5
6
7
8
9
10
11
12
13
14
15
16
17
18
19
20
21
22
23
24
25
26
27
28
29
30
31
32
33
34
35
36
37
38
39
40
41
42
43
44
45
46
| import React from "react";
class Demo1 extends React.PureComponent {
render() {
return <div>我是demo1 {this.props.a}</div>;
}
}
class Demo2 extends React.PureComponent {
render() {
return <div>我是demo2</div>;
}
}
function withLog(WrapComponent) {
return class extends React.Component {
componentDidMount() {
console.log("挂载了");
}
render() {
return <WrapComponent {...this.props} />;
}
};
}
const MyCom = withLog(Demo1);
const MyCom1 = withLog(Demo2);
class App extends React.PureComponent {
state = {
msg: "父组件数据",
};
render() {
return (
<>
<MyCom a={this.state.msg} c="1231231" />
<MyCom1 />
</>
);
}
}
export default App;
|
13.2、高阶组件实战
请求地址
dogApi:https://dog.ceo/api/breeds/image/random
catApi:https://api.thecatapi.com/v1/images/search
1
2
3
4
5
6
7
8
9
10
11
12
13
14
15
16
17
18
19
20
21
22
23
24
25
26
27
28
29
30
31
32
33
34
35
36
37
38
39
40
41
42
43
44
45
46
47
48
49
50
51
52
53
54
55
56
57
58
59
60
| import axios from "axios";
import React from "react";
class MyCat extends React.Component {
render() {
return (
<>
<img src={this.props.url} width="200" alt="" />
<div>这是一只猫</div>
</>
);
}
}
class MyDog extends React.Component {
render() {
return (
<>
<img src={this.props.url} width="200" alt="" />
<div>这是一只狗</div>
</>
);
}
}
function withAnimal(WrapComponent, url, type) {
return class extends React.Component {
state = {
imgUrl: "",
};
componentDidMount() {
axios.get(url).then((res) => {
this.setState({
imgUrl: type ? res.data.message : res.data[0].url,
});
});
}
render() {
return <WrapComponent url={this.state.imgUrl} />;
}
};
}
const Cat = withAnimal(MyCat, "https://api.thecatapi.com/v1/images/search", 0);
const Dog = withAnimal(MyDog, "https://dog.ceo/api/breeds/image/random", 1);
class App extends React.Component {
render() {
console.log("渲染");
return (
<>
<Cat></Cat>
<Dog></Dog>
</>
);
}
}
export default App;
|
