📚 本指南旨在带你从零开始 Mastering React Redux,特别是现代标准的 Redux Toolkit (RTK) 写法。
目录
- 基础篇:RTK 核心与快速上手
- 进阶篇:复杂状态与异步逻辑
- 高级篇:RTK Query 与性能优化
一、 基础篇:RTK 核心与快速上手
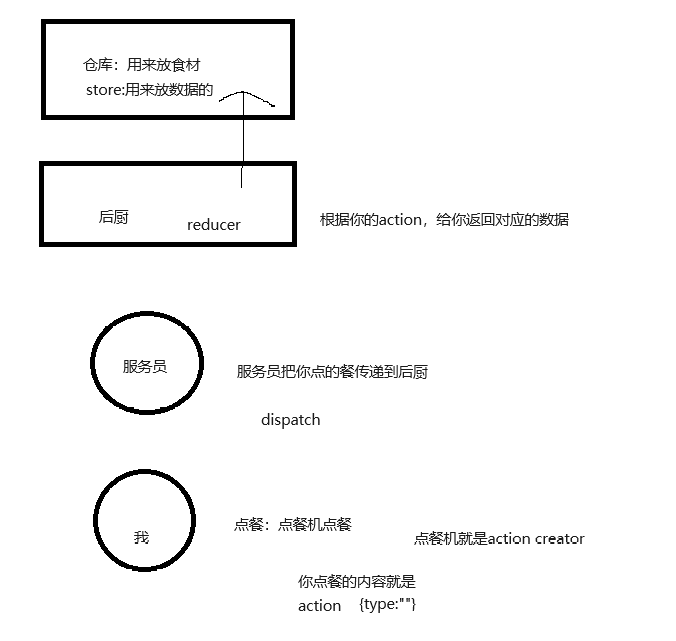
[!NOTE]
- Store:用来存数据的。
- Reducer:是一个函数,用来处理数据的。
- Action:是一个具有
type 字段的普通对象,用来描述要进行什么操作。 - Action Creator:创建并返回 Action 对象的函数。
- Dispatch:更新 State 的唯一方法,调用
store.dispatch(action)。
1.1 Redux 是什么?
Redux 是一个用于 JavaScript 应用的状态容器,提供可预测的状态管理。
- 单一数据源:应用的所有状态都存储在一个对象树中。
- 状态是只读的:唯一改变状态的方法是触发一个 Action。
- 使用纯函数修改:编写 Reducer 来描述 Action 如何转换 State。
[!TIP]
为什么使用 Redux Toolkit (RTK)?
官方推荐!RTK 是现代 Redux 的标准写法。它解决了传统 Redux 配置复杂、样板代码多、需手动添加不可变逻辑等痛点。RTK 内置了 Immer(简化不可变更新)、Thunk(异步)、DevTools 等工具。
1.2 安装
使用 Create React App 或 Vite 创建项目后,安装核心依赖:
1
| npm install @reduxjs/toolkit react-redux
|
1.3 核心概念与实战 (Counter Example)
我们将通过一个计数器应用来演示最核心的 API。
1)第一步:创建 Slice (切片)
Slice 是 Redux 逻辑的集合(包含 State,Reducers,Actions)
src\redux\modules\counterSlice.js
1
2
3
4
5
6
7
8
9
10
11
12
13
14
15
16
17
18
19
20
21
22
23
24
25
26
27
28
29
| import { createSlice } from "@reduxjs/toolkit";
const counterSlice = createSlice({
name: "counter",
initialState: {
value: 0,
},
reducers: {
increment: (state) => {
state.value += 1;
},
decrement: (state) => {
state.value -= 1;
},
incrementByAmount: (state, action) => {
state.value += action.payload;
},
},
});
export const { increment, decrement, incrementByAmount } = counterSlice.actions;
export default counterSlice.reducer;
|
2)第二步:配置 Store
使用 configureStore 创建 Store,它会自动组合 Slice Reducers 并添加常用中间件。
src\redux\store.js
1
2
3
4
5
6
7
8
9
| import { configureStore } from "@reduxjs/toolkit";
import counterSlice from "./modules/counterSlice";
export const store = configureStore({
reducer: {
counter: counterSlice,
},
});
|
3)第三步:注入 Store
在应用入口文件中,使用 <Provider> 将 Store 注入到 React 组件树中。
src/main.jsx (或 index.js):
1
2
3
4
5
6
7
8
| import { Provider } from "react-redux";
import { store } from "./app/store";
ReactDOM.createRoot(document.getElementById("root")).render(
<Provider store={store}>
<App />
</Provider>,
);
|
4)第四步:在组件中使用 Hooks
React Redux 提供了两个主要的 Hooks:
useSelector:从 Store 中读取数据。useDispatch:发送 Action 以触发状态更新。
src\pages\Home.jsx
1
2
3
4
5
6
7
8
9
10
11
12
13
14
15
16
17
18
19
20
21
22
23
24
25
26
27
28
29
30
31
32
33
34
35
36
37
38
| import { useState } from "react";
import { useSelector, useDispatch } from "react-redux";
import {
increment,
decrement,
incrementByAmount,
} from "../redux/modules/counterSlice";
function Home() {
const count = useSelector((state) => state.counter.value);
const dispatch = useDispatch();
const [incrementAmount, setIncrementAmount] = useState("2");
return (
<div>
<div className="row">
<button onClick={() => dispatch(decrement())}>-</button>
<span className="value">{count}</span>
<button onClick={() => dispatch(increment())}>+</button>
</div>
<div className="row">
<input
value={incrementAmount}
onChange={(e) => setIncrementAmount(e.target.value)}
/>
<button
onClick={() =>
dispatch(incrementByAmount(Number(incrementAmount) || 0))
}
>
Add Amount
</button>
</div>
</div>
);
}
export default Home;
|
二、 进阶篇:复杂状态与异步逻辑
实际应用远比计数器复杂。我们需要处理 API 请求、加载状态以及更复杂的数据结构。
2.1 异步逻辑与数据请求:createAsyncThunk
对于初学者来说,Redux 的异步逻辑可能有点绕。我们先用一个生活中的例子来理解。
1)为什么需要异步?
Redux 的标准 dispatch 是同步的:你点击按钮 -> 发送 action -> store 立即更新 -> 页面刷新。这一切发生在一瞬间。
但这就像你去快餐店,点完汉堡如果立刻就能拿走,那就是同步。但现实中,很多操作是异步的:
- 点外卖:你下单(dispatch action),但饭不会立马到。你需要等待(loading),直到骑手送到(success)或者餐厅取消订单(failed)。
- API 请求:前端向服务器发起请求,服务器处理需要几百毫秒甚至几秒,这段时间内页面通常显示”加载中”。
Redux Toolkit (RTK) 提供了一个强大的工具 createAsyncThunk 来专门处理这种”下单 -> 等待 -> 收到结果”的流程。它不需要你手动配置复杂的中间件。
2)实战:实现一个”模拟网络请求的加法”
假设我们有一个”异步加法”按钮,点击后需要等待 1 秒钟(模拟服务器响应),然后数字才会加 1。
第一步:定义异步 Action (Thunk)
在 counterSlice.js 中,我们创建一个”点外卖”的动作。
1
2
3
4
5
6
7
8
9
10
11
12
13
14
15
16
17
18
19
| import { createSlice, createAsyncThunk } from "@reduxjs/toolkit";
export const incrementAsync = createAsyncThunk(
"counter/fetchCount",
async (amount) => {
const response = await new Promise((resolve) =>
setTimeout(() => resolve({ data: amount }), 1000),
);
return response.data;
},
);
|
第二步:监听状态变化 (Pending / Fulfilled / Rejected)
当 incrementAsync 被 dispatch 触发时,Redux 会自动派发三种状态的 action,就像外卖订单的状态变化:
- pending (进行中):外卖刚下单,正在做。
- fulfilled (成功):外卖送到了。
- rejected (失败):外卖被取消了(网络错误等)。
我们需要在 createSlice 的 extraReducers 字段中监听这些状态,并更新 store。
1
2
3
4
5
6
7
8
9
10
11
12
13
14
15
16
17
18
19
20
21
22
23
24
25
26
27
28
29
30
31
32
33
34
35
36
37
38
39
40
41
42
43
44
45
46
47
48
49
50
51
|
import { createSlice, createAsyncThunk } from "@reduxjs/toolkit";
export const incrementAsync = createAsyncThunk(
"counter/fetchCount",
async (amount) => {
const response = await new Promise((resolve) =>
setTimeout(() => resolve({ data: amount }), 1000),
);
return response.data;
},
);
const counterSlice = createSlice({
name: "counter",
initialState: {
value: 0,
status: "idle",
},
reducers: {
},
extraReducers: (builder) => {
builder
.addCase(incrementAsync.pending, (state) => {
state.status = "loading";
})
.addCase(incrementAsync.fulfilled, (state, action) => {
state.status = "idle";
state.value += action.payload;
})
.addCase(incrementAsync.rejected, (state) => {
state.status = "failed";
});
},
});
export default counterSlice.reducer;
|
第三步:在组件中使用
组件中的写法和普通 action 一模一样,使用 dispatch 即可。我们可以利用 state 中的 status 来控制按钮的禁用状态。
1
2
3
4
5
6
7
8
9
10
11
12
13
14
15
16
17
18
19
20
21
22
23
24
25
26
27
28
29
30
31
| import { useDispatch, useSelector } from "react-redux";
import { incrementAsync } from "../redux/modules/counterSlice";
import { useState } from "react";
function Home() {
const dispatch = useDispatch();
const { value, status } = useSelector((state) => state.counter);
const [incrementAmount, setIncrementAmount] = useState("2");
return (
<div>
<div className="row">
<input
value={incrementAmount}
onChange={(e) => setIncrementAmount(e.target.value)}
/>
{/* 点击触发异步操作 如果正在加载,禁用按钮防止重复点击,提升用户体验 */}
<button
onClick={() => dispatch(incrementAsync(Number(incrementAmount) || 0))}
disabled={status === "loading"}
>
{status === "loading" ? "计算中..." : "异步加"}
</button>
{/* 显示当前值 */}
<div>当前值: {value}</div>
</div>
</div>
);
}
export default Home;
|
总结一下流程:
- Dispatch: 用户点击按钮 ->
dispatch(incrementAsync(5)) - Pending: Redux 自动触发
pending -> status 变为 'loading' -> 按钮变灰。 - Async Work:
incrementAsync 里的 async 函数开始执行(等待 1 秒)。 - Fulfilled: 1 秒后 Promise 完成 -> Redux 自动触发
fulfilled -> status变回 'idle',value 更新。 - Re-render: 组件重新渲染,显示最新的数字。
2.2 异步逻辑的代码优化
随着项目规模扩大,异步逻辑会变得臃肿。我们可以从结构分离、职责单一和逻辑复用三个维度进行优化。
1. 分离 Async Thunk 定义
将所有 Thunk 放在 Slice 文件中会导致文件过长且容易引发循环依赖。建议将异步逻辑提取到独立文件中。
src/features/counter/counterThunks.js: 定义异步操作。src/features/counter/counterSlice.js: 引入并处理状态。
1
2
3
4
5
6
7
8
9
10
11
12
13
14
|
import { createAsyncThunk } from "@reduxjs/toolkit";
export const getHistory = createAsyncThunk(
"counter/getHistory",
async (params) => {
const response = await fetch("https://jsonplaceholder.typicode.com/posts");
const res = await response.json();
return res;
},
);
|
2. 职责单一与精细化错误处理
- 职责单一:Thunk 只负责“拿数据”。复杂的数据转换逻辑应放在
reducer 中,保持 Thunk 清洁。 - 错误处理:使用
rejectWithValue 返回自定义错误载荷,以便在界面上展示更有意义的提示。
1
2
3
4
5
6
7
8
9
10
11
12
13
14
15
16
17
18
19
| import { createAsyncThunk } from "@reduxjs/toolkit";
export const getHistory = createAsyncThunk(
"counter/getHistory",
async (params, { rejectWithValue }) => {
try {
const response = await fetch(
"https://jsonplaceholder.typicode.com/posts",
);
const res = await response.json();
return res;
} catch (err) {
return rejectWithValue(err.response.data);
}
},
);
|
3. 使用 addMatcher 减少样板代码
如果多个异步操作都有相同的 Loading 或 Error 处理逻辑,可以使用 addMatcher 进行统一拦截,避免在每个 addCase 中重复编写。
1
2
3
4
5
6
7
8
9
10
11
12
13
14
15
16
17
18
19
20
21
22
23
24
25
26
27
28
29
30
31
32
33
34
35
36
37
38
39
40
41
42
43
44
45
|
import { createSlice } from "@reduxjs/toolkit";
import { getHistory } from "../thunks/counterThunks";
const counterSlice = createSlice({
name: "counter",
initialState: {
status: "idle",
error: "",
value: [],
},
reducers: {},
extraReducers: (builder) => {
builder
.addCase(getHistory.fulfilled, (state, action) => {
state.value = [];
state.value = action.payload;
})
.addMatcher(
(action) => action.type.endsWith("/pending"),
(state) => {
state.status = "loading";
},
)
.addMatcher(
(action) => action.type.endsWith("/fulfilled"),
(state) => {
state.status = "idle";
},
)
.addMatcher(
(action) => action.type.endsWith("/rejected"),
(state, action) => {
state.status = "failed";
state.error = action.error.message;
},
);
},
});
export default counterSlice.reducer;
|
addMatcher 在项目后期优化中非常强大,它可以让你像写“拦截器”一样统一管理全局的异步状态。
2.3 综合案例
定义异步操作src\redux\modules\counterThunks.js
1
2
3
4
5
6
7
8
9
10
11
12
13
14
15
16
17
18
19
20
21
22
23
24
25
26
27
28
29
30
31
32
33
| import { createAsyncThunk } from "@reduxjs/toolkit";
export const getHistory = createAsyncThunk(
"counter/getHistory",
async (params, { rejectWithValue }) => {
try {
const response = await fetch("/posts");
const res = await response.json();
return res;
} catch (err) {
return rejectWithValue(err.response.data);
}
},
);
export const getComments = createAsyncThunk(
"counter/getComments",
async (postId, { rejectWithValue }) => {
try {
const response = await fetch(`/comments?postId=${postId}`);
const res = await response.json();
return res;
} catch (err) {
return rejectWithValue(err.response.data);
}
},
);
|
引入并处理状态src\redux\modules\counterSlice.js
1
2
3
4
5
6
7
8
9
10
11
12
13
14
15
16
17
18
19
20
21
22
23
24
25
26
27
28
29
30
31
32
33
34
35
36
37
38
39
40
41
42
43
44
45
46
47
| import { createSlice } from "@reduxjs/toolkit";
import { getHistory, getComments } from "./counterThunks";
const counterSlice = createSlice({
name: "counter",
initialState: {
status: "idle",
value: [],
comments: [],
},
reducers: {},
extraReducers: (builder) => {
builder
.addCase(getHistory.fulfilled, (state, action) => {
state.value = action.payload;
})
.addCase(getComments.fulfilled, (state, action) => {
state.value = [];
state.comments = action.payload;
})
.addMatcher(
(action) => action.type.endsWith("/pending"),
(state) => {
state.status = "loading";
},
)
.addMatcher(
(action) => action.type.endsWith("/fulfilled"),
(state) => {
state.status = "idle";
},
)
.addMatcher(
(action) => action.type.endsWith("/rejected"),
(state) => {
state.status = "failed";
},
);
},
});
export default counterSlice.reducer;
|
组件中使用src\pages\Home.jsx
1
2
3
4
5
6
7
8
9
10
11
12
13
14
15
16
17
18
19
20
21
22
23
24
25
26
27
28
29
30
31
32
33
34
35
36
| import { useSelector, useDispatch } from "react-redux";
import { getHistory, getComments } from "../redux/modules/counterThunks";
function Home() {
const { value, status, comments } = useSelector(
(state) => state.counterSlice,
);
const dispatch = useDispatch();
return (
<>
<h2>首页</h2>
<button onClick={() => dispatch(getHistory({ count: "5" }))}>
数据请求
</button>
<button onClick={() => dispatch(getComments(1))}>获取评论</button>
<hr />
<p>
状态:
{status === "loading"
? "加载中..."
: status === "idle"
? "空闲"
: "失败"}
</p>
{value.map((item) => (
<p key={item.id}>{item.title}</p>
))}
{comments.map((item) => (
<p key={item.id}>{item.name}</p>
))}
</>
);
}
export default Home;
|
2.4 记忆化选择器:createSelector
在大型应用中,我们经常需要根据原始数据计算出衍生状态(如:列表过滤、数据转换)。如果直接在 useSelector 中编写复杂的计算逻辑,可能会导致不必要的重渲染。
1)为什么需要它?
默认情况下,只要 Redux Store 更新,所有的 useSelector 都会重新运行。如果你的 Selector 返回的是一个新引用(例如使用 .filter()、.map() 或返回一个新对象),React Redux 会认为数据发生了变化,从而触发组件重渲染——即使数据内容其实没变。
createSelector 可以**记忆(Memoize)**计算结果。只要输入参数没变,它就会直接返回缓存的结果,不会重新计算,也不会触发重渲染。
2)基本用法:数据预处理
假设后端接口返回的用户信息中,性别是数字代码(1 代表男,2 代表女)。我们希望在组件中直接拿到文字。
1
2
3
4
5
6
7
8
9
10
11
12
13
14
15
16
17
18
19
20
21
22
23
24
25
26
27
28
29
30
| import { createSlice, createSelector } from "@reduxjs/toolkit";
const userSlice = createSlice({
name: "user",
initialState: {
gender: "1",
hobby: [
{ id: 1, name: "看书" },
{ id: 2, name: "写代码" },
{ id: 3, name: "打游戏" },
],
},
reducers: {},
});
const genderFn = (state) => state.user.gender;
const hobbyFn = (state) => state.user.hobby;
export const selectUser = createSelector(
[genderFn, hobbyFn],
(gender, hobby) => {
console.log("正在转换数据...");
const genderText = gender === "1" ? "男" : "女";
return {
gender: genderText,
hobbyList: hobby.filter((item) => item.id === 1),
};
},
);
|
在组件中使用:
1
2
3
4
5
6
7
8
9
10
11
12
13
14
15
16
17
18
| import { useSelector } from "react-redux";
import { selectUser } from "../redux/modules/userSlice";
function Home() {
const { gender, hobbyList } = useSelector(selectUser);
return (
<>
<p>性别:{gender}</p> // 直接使用处理好的属性
<span>爱好:</span>
{hobbyList.map((item) => (
<span key={item.id}>{item.name}</span>
))}
</>
);
}
export default Home;
|
3)传参的标准写法
有时我们需要根据组件传入的参数(如 ID)来动态查询数据。标准做法是将参数作为 Selector 的一个输入项。
1
2
3
4
5
6
7
8
9
10
11
12
|
const selectItemId = (state, itemId) => itemId;
export const selectItemById = createSelector(
[(state) => state.user.hobby, selectItemId],
(hobby, id) => {
console.log(`正在查找 ID 为 ${id} 的数据...`);
return hobby.find((item) => item.id === id);
},
);
|
在组件中使用:
1
2
|
const item = useSelector((state) => selectItemById(state, props.id));
|
4)高级用法:工厂函数模式 (Factory Function)
虽然上述传参方式在逻辑上是通用的,但在 “一个页面渲染多个同类组件” 时,单例 Selector 的缓存深度只有 1,会导致不同组件实例之间互相竞争缓存,产生不必要的重计算。这时需要使用工厂函数。
标准工厂模式写法:
1
2
3
4
5
6
7
8
9
10
11
12
13
14
15
16
17
18
19
20
|
export const makeSelectTodoById = () =>
createSelector(
[
(state) => state.todos.list,
(state, todoId) => todoId,
],
(todos, id) => {
console.log(`实例正在查找 ID 为 ${id} 的待办事项...`);
return todos.find((todo) => todo.id === id);
},
);
|
在组件中正确调用:
1
2
3
4
5
6
7
8
9
10
11
| import { useMemo } from "react";
function TodoItem({ id }) {
const selectTodoById = useMemo(makeSelectTodoById, []);
const todo = useSelector((state) => selectTodoById(state, id));
return <div>{todo?.text}</div>;
}
|
5)最佳实践总结
- 位置:尽量在对应的
Slice 文件中定义 Selector,保持逻辑内聚。 - 职责:将“原始数据获取”与“数据预处理”分开调用。
- 性能:不要在组件内部使用
createSelector(每次渲染都会创建新实例),应在组件外部定义。
Redux 最强大的特性之一是调试体验。
- 安装 Chrome 扩展程序 Redux DevTools。
- RTK 的
configureStore 默认开启 DevTools。 - 你可以看到每一个 Action 的触发时间、Payload 内容以及 State 的差异 (Diff)。
- 时间旅行 (Time Travel):你可以点击 “Jump” 跳转到任意历史状态,重现 Bug 现场。
三、高级篇:RTK Query 与性能优化
RTK Query (RTKQ) 是 RTK 内置的一个强大的数据获取和缓存工具。它不仅帮你发请求,最核心的是它能自动管理缓存状态。
[!NOTE]
为什么要用它?
在没有 RTKQ 之前,我们需要手动管理:请求加载状态 (isLoading)、错误处理 (error)、useEffect 中的请求触发、以及最头疼的“跨页面同步缓存数据”。RTKQ 把这些都自动完成了。
3.1 基础用法
1
2
3
4
5
6
7
8
9
10
11
12
13
14
15
16
17
18
19
20
21
22
23
24
25
26
27
28
29
30
31
32
33
34
35
36
37
38
39
40
41
42
43
44
45
46
47
48
49
50
51
52
53
54
55
56
57
58
| `步骤一:创建api接口`;
import { createApi, fetchBaseQuery } from "@reduxjs/toolkit/query/react";
export const todoApi = createApi({
reducerPath: "createApi",
baseQuery: fetchBaseQuery({ baseUrl: "/api" }),
endpoints: (builder) => ({
getTodos: builder.query({
query: () => "/todos",
}),
}),
});
console.log(todoApi);
export const { useGetTodosQuery } = todoApi;
`步骤二:配置 Store 中间件`;
import { configureStore } from "@reduxjs/toolkit";
import { todoApi } from "./api/todoApi";
export const store = configureStore({
reducer: {
[todoApi.reducerPath]: todoApi.reducer,
[xxxx.reducerPath]: xxxx.reducer,
},
middleware: (gDM) =>
gDM().concat(todoApi.middleware, xxxx.middleware),
});
`步骤三:组件中使用 Hooks`;
import { useGetTodosQuery } from "../redux/api/todoApi";
function Home() {
const { data, isLoading, error } = useGetTodosQuery();
return (
<>
<p>首页</p>
{isLoading && <p>加载中...</p>}
{error && <p>加载失败</p>}
{data && data.map((todo) => <p key={todo.id}>{todo.title}</p>)}
</>
);
}
export default Home;
|
3.2 RTK Query 核心概念详解
1)获取数据:Query (查询操作)
Query 是 RTK Query 中最基础的数据获取方式,主要用于从服务器端拉取状态并缓存在本地。
特点与用法:
- 默认情况下,对应的
useXXXQuery Hook 在组件挂载时会自动发起请求。 - 它返回一个包含
data (数据), isLoading (初次加载状态), isFetching (每次请求状态), error (错误信息) 等丰富属性的对象。 - 绝大多数 Query 是
GET 请求,但有些特殊场景(如复杂的搜索查询需要传递大量参数体)也会使用 POST 请求作为 Query。
代码示例拆解:
1
2
3
4
5
6
7
8
9
10
11
12
13
14
15
16
17
18
19
20
21
22
23
24
25
26
27
28
29
30
31
32
33
34
35
36
|
endpoints: (builder) => ({
getTodos: builder.query({
query: () => "/todos",
}),
getTodosByStatus: builder.query({
query: (status) => `/todos?status=${status}`,
}),
getTodosById: builder.query({
query: (id) => ({
url: "/posts",
method: "POST",
body: { postId: id }
}),
})
export const { useGetTodosQuery, useGetTodosByStatusQuery, useGetTodosByIdQuery } = todoApi;
`组件中使用`
const { data: allTodos, isLoading } = useGetTodosQuery();
const [status, setStatus] = useState("completed");
const { data: filteredTodos } = useGetTodosByStatusQuery(status);
const searchFilters = { keyword: "React", date: "today" };
const { data: searchResults, isFetching } = useGetTodosByIdQuery(searchFilters);
|
2)修改数据:Mutation (变更操作)
在 RTK Query 中,所有的 API 端点 (endpoints) 分为两类:
- Query (查询):用于获取数据,在组件挂载时自动触发(如 GET 请求)。对应的 Hook 叫
useXXXQuery。 - Mutation (变更):用于修改服务器数据(如 POST、PUT、DELETE 请求)。对应的 Hook 叫
useXXXMutation。
特点与用法:
mutation 不会在组件挂载时自动触发。它会返回一个包含两个元素的数组:[触发函数的引用 (trigger), 包含状态的对象 (result)]。- 它通常绑定到表单提交或按钮点击事件上。
代码示例拆解:
1
2
3
4
5
6
7
8
9
10
11
12
13
14
15
16
17
18
19
20
21
22
23
24
25
26
27
28
29
30
31
32
33
34
35
36
37
38
39
40
41
42
|
addTodo: builder.mutation({
query: (newTodo) => ({
url: "/todos",
method: "POST",
body: newTodo,
}),
});
addUser: builder.mutation({
query: (user) => ({
url: "/users",
method: "POST",
body: user
}),
})
export const { useAddUserMutation } = todoApi;
`组件中使用`
import { useAddUserMutation } from "../redux/api/todoApi";
function Home() {
const [addUser, { isLoading: addUserLoading, isSuccess: addUserSuccess, error: addUserError }] = useAddUserMutation();
const fn = async() => {
const res = await addUser({ name: "test", age: 18 })
console.log(res);
}
return (
<>
<p>首页</p>
<button onClick={fn}>添加用户</button>
{addUserLoading && <p>添加中...</p>}
{addUserSuccess && <p>添加成功</p>}
{addUserError && <p>添加失败</p>}
</>
)
}
|
4)手动触发查询:useLazyXXXQuery
默认情况下,useXXXQuery 在组件挂载时就会立即、自动发起网络请求。但在某些场景下(例如:点击按钮搜索、展开面板时才加载详情),我们希望手动去触发这个 GET 请求。这时候就需要用到懒加载钩子 useLazyXXXQuery。
特点与用法:
- 类似于 Mutation 的 Hook 设计,它返回一个数组
[触发函数(trigger), 查询状态结果(result)]。 - 不会在组件挂载时自动发送请求。
- 当你需要发送请求时,调用触发函数,并可以传递查询参数。
代码示例拆解:
1
2
3
4
5
6
7
8
9
10
11
12
13
14
15
16
17
18
19
20
21
22
|
import { useLazyGetTodosQuery } from "../redux/api/todoApi";
function SearchPage() {
const [triggerGetTodos, { data, isLoading, isFetching }] = useLazyGetTodosQuery();
const handleSearch = () => {
triggerGetTodos();
};
return (
<div>
<button onClick={handleSearch}>
{isLoading || isFetching ? "加载中..." : "点击加载列表"}
</button>
{data && data.map((todo) => <p key={todo.id}>{todo.title}</p>)}
</div>
);
}
|
有时后端返回的数据格式并不符合前端的使用要求(比如外面包裹了一层特定的结构,或者缺少某个字段)。transformResponse 允许你在数据被存入 Redux 缓存之前,提前“拦截”并转换它。
为什么要用?
将处理后端“奇葩”数据结构的操作集中在 API 切片里,保持前端组件的数据逻辑纯粹。这样能避免你在每个组件 useSelector 获取数据时都要反复去写 .map() 或解构特定字段。
代码示例拆解:
假设后端返回的列表数据长这样:
{ code: 200, message: "成功", data: { list: [ {id:1, title:"写代码"} ] } }
而我们只想在页面中直接使用 list 数组。
1
2
3
4
5
6
7
8
9
10
| getTodos: builder.query({
query: () => "/todos",
transformResponse: (response, meta, arg) => {
return response.data.list;
},
});
|
这是 RTK Query 避免手动写 dispatch 来刷新数据的核心“黑科技”:基于标签 (Tags) 的自动化缓存失效系统。
把它想象成一个**“贴标签与撕标签”**的游戏:
providesTags:用来**“贴标签”**。告诉 RTKQ,当前通过查询获得回来的这份数据,叫什么名字。invalidatesTags:用来**“撕标签”** (宣告失效)。当执行增删改等 mutating 操作后,告诉 RTKQ 哪些标签的数据已经过时了,必须重新拉取。
案例生动解析:
第一步:查询列表时贴标签
1
2
3
4
5
| getTodos: builder.query({
query: () => "/todos",
providesTags: [{ type: "Todos", id: "LIST" }],
});
|
此时,RTKQ 内部的记事本上写着:“用 getTodos 获取的数据,被贴上了 Todos-LIST 的标签。如果以后谁撕毁了这个标签,我就得再发一次 GET /todos 重新拿数据。”
第二步:添加数据时撕标签
1
2
3
4
5
| addTodo: builder.mutation({
query: (newTodo) => ({ ... }),
invalidatesTags: [{ type: "Todos", id: "LIST" }]
})
|
当你调用 addTodo 并在服务端创建成功后,RTKQ 看到你要“撕毁” Todos-LIST 标签。它会去找记事本,发现 getTodos 绑定了这个标签数据,于是它会自动且静默地在此刻触发一次 getTodos,实现了前端列表的无缝自动刷新。
如果要做到更细节粒度的缓存控制(比如只修改列表中某一项的数据,不全列表拉取),可以通过给每个具体的 item 贴带 id 的标签(如 { type: "Todos", id: todo.id })来实现。这也是为什么我们在前文基础代码里要写 ...result.map(({ id }) => ({ type: "Todos", id })) 这样复杂的结构,这正是为了极致的单条数据按需更新。
3.3 实战:构建一个 Todo CRUD API
我们将创建一个完整的待办事项管理 API 接口。
src/redux/api/todoApi.js
1
2
3
4
5
6
7
8
9
10
11
12
13
14
15
16
17
18
19
20
21
22
23
24
25
26
27
28
29
30
31
32
33
34
35
36
37
38
39
40
41
42
43
44
45
46
| import { createApi, fetchBaseQuery } from "@reduxjs/toolkit/query/react";
export const todoApi = createApi({
reducerPath: "todoApi",
baseQuery: fetchBaseQuery({ baseUrl: "http://localhost:3000" }),
tagTypes: ["Todos"],
endpoints: (builder) => ({
getTodos: builder.query({
query: () => "/todos",
providesTags: (result) =>
result ? [...result.map(({ id }) => ({ type: "Todos", id })),{ type: "Todos", id: "LIST" }]: [{ type: "Todos", id: "LIST" }]
}),
addTodo: builder.mutation({
query: (newTodo) => ({
url: "/todos",
method: "POST",
body: newTodo,
}),
invalidatesTags: [{ type: "Todos", id: "LIST" }],
}),
deleteTodo: builder.mutation({
query: (id) => ({
url: `/todos/${id}`,
method: "DELETE",
}),
invalidatesTags: (result, error, id) => [
{ type: "Todos", id },
{ type: "Todos", id: "LIST" },
],
}),
}),
});
export const { useGetTodosQuery, useAddTodoMutation, useDeleteTodoMutation } =
todoApi;
|
2)配置 Store 中间件
RTKQ 需要专门的 Reducer 和中间件来处理缓存管理。
src/redux/store.js
1
2
3
4
5
6
7
8
9
10
11
12
| import { configureStore } from "@reduxjs/toolkit";
import { todoApi } from "./api/todoApi";
export const store = configureStore({
reducer: {
[todoApi.reducerPath]: todoApi.reducer,
},
middleware: (getDefaultMiddleware) =>
getDefaultMiddleware().concat(todoApi.middleware),
});
|
3)在组件中使用 Hooks
RTKQ 返回的 Hook 包含了所有你需要的状态,无需额外定义 useState。
src/pages/TodoPage.jsx
1
2
3
4
5
6
7
8
9
10
11
12
13
14
15
16
17
18
19
20
21
22
23
24
25
26
27
28
29
30
31
32
33
34
35
36
37
38
| import {
useGetTodosQuery,
useAddTodoMutation,
useDeleteTodoMutation,
} from "../redux/api/todoApi";
function TodoPage() {
const { data: todos, error, isLoading, isFetching } = useGetTodosQuery();
const [addTodo, { isLoading: isAdding }] = useAddTodoMutation();
const [deleteTodo] = useDeleteTodoMutation();
if (isLoading) return <div>初次加载中...</div>;
if (error) return <div>请求出错: {error.message}</div>;
return (
<div>
<h3>待办事项 {isFetching && " (同步中...)"}</h3>
<button
disabled={isAdding}
onClick={() => addTodo({ title: "新任务", completed: false })}
>
{isAdding ? "添加中..." : "添加任务"}
</button>
<ul>
{todos.map((todo) => (
<li key={todo.id}>
{todo.title}
<button onClick={() => deleteTodo(todo.id)}>删除</button>
</li>
))}
</ul>
</div>
);
}
|
这是 RTK Query 的灵魂。它通过“发布-订阅”模式管理缓存:
providesTags (发布):告诉 RTKQ 这份数据贴了什么标签(比如 Todos)。invalidatesTags (撤销):当执行修改操作后,高速 RTKQ 哪些标签过期了。- 自动重刷新:RTKQ 发现当前页面正在使用的
getTodos 订阅了 Todos 标签,而该标签由于 addTodo 变成了“失效”状态,于是 RTKQ 会自动重新发起网络请求,同步最新的列表。
[!TIP]
缓存自动清理
如果没有任何组件订阅某个 API 端点的数据(即没在任何地方调用该 Hook),RTKQ 会在一段时间后(默认 60 秒)自动从内存中删除这些垃圾数据。
3.4 性能优化:Memoization
每当 Redux Store 更新时,所有使用 useSelector 的组件都会重新计算其 Selector。
- 避免引用陷阱:如果在 Selector 中返回了新数组或对象(如
state.items.filter(...)),必须使用记忆化工具。 - 推荐方案:使用
createSelector。它不仅能缓存昂贵的计算结果,还能通过保持引用一致性来防止子组件的不必要重渲染。
[!TIP]
详细的 createSelector 配置与代码片段请参考前文:2.4 记忆化选择器:createSelector。
3.5 目录结构最佳实践
推荐基于功能 (Feature-based) 的文件夹结构,而不是按文件类型(actions/reducers)分类。
1
2
3
4
5
6
7
8
9
10
11
12
13
14
| ├── 📁 src/
│ ├── 📁 app/ # 全局配置 (Store, 路由配置)
│ │ └── store.js
│ ├── 📁 assets/ # 静态资源 (图片, 字体, 全局样式)
│ ├── 📁 components/ # 通用基础组件 (非业务 logic)
│ ├── 📁 features/ # 业务功能模块 (Slice + 业务组件 + API)
│ │ └── 📁 counter/ # 示例功能
│ │ ├── counterSlice.js
│ │ └── Counter.jsx
│ ├── 📁 hooks/ # 通用 Hooks (useAuth, useTheme 等)
│ ├── 📁 pages/ # 页面级组件 (路由入口)
│ ├── 📁 utils/ # 工具函数 (formatDate, validators 等)
│ ├── App.jsx # 根组件
│ └── index.js # 入口文件
|
核心说明:
- Feature-first:
features/ 目录是核心。将一个功能的所有相关代码(Slice, 组件, API)放在同一个文件夹下,保持高内聚。 - Layered Structure:
components/ 存放纯 UI 组件,pages/ 存放页面容器,features/ 存放业务逻辑,层次分明。
四、总结
- 始终使用 Redux Toolkit:不要再手写传统的 Redux 样板代码。
- State 范式化:尽量保持 State 扁平化,避免深层嵌套。
- 不要把所有数据都放进 Redux:
- Form state -> Local state (
useState) - Server cache -> RTK Query
- Global UI state / Shared data -> Redux Slice
- TypeScript:RTK 对 TypeScript 支持极佳,利用它可以获得强大的类型提示。
Happy Coding with React & Redux!
